Machine “Power Users” Push Limits of Precision
For this shop, moving into micron-tolerance work required not just a new machining center, but also a willingness to understand technical features and techniques that never come into play for many programmers and operators.
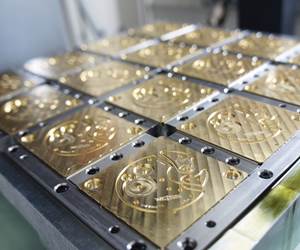
Microfluidics industry R&D applications have called for milling channels with extremely smooth finishes into plastic or, as seen here, titanium plates. The channel here measures 0.006 inch and requires a 0.2 µm surface finish.
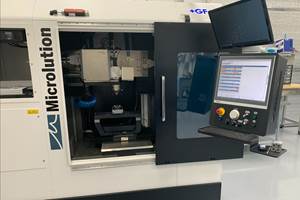
This July-issue feature article tells the story of how a single machine tool catalyzed a massive transformation at Integral Machining, a 6,000-square-foot contract manufacturer in the Toronto area. Thanks largely to the addition of Kern Microtechnik’s five-axis Evo, the shop is serving new customers that often demand tolerances measured in single-digit microns—far greater precision than anything it had handled before. What’s more, lessons learned in the process have helped improve operations on less demanding work as well.
However, the machine alone wasn’t enough. This shop had to learn new strategies in order push it beyond its advertised precision of ±2 µm on the part. Indeed, the more I talked to Andrew Sweeting, the machine’s chief operator, the more he reminded me of a smartphone “power user” (these are the people who really dive deep; they seem to have an app for everything, use mountains of data, and might even be willing to dive into the firmware to customize their device). Here are a few examples of thinking beyond standard features and functions:
Finding the kinematic point. Most five-axis machine tools are permanently configured that way—that is, the fourth and fifth axes are a permanent, integral part of the overall structure. That’s not the case with the Kern Evo. According to this machine tool builder, every machine has an “accuracy budget,” and each added component—an additional axis, a tool changer—detracts from that budget. To facilitate the kind of precision Integral Machining is achieving, the machine’s fourth/fifth axis table is installed only for the applications that require it.
For any job requiring tolerances tighter than about 5 µm, a crucial step in installing the table is finding the kinematic point, or the theoretical center about which the table pivots. Boiled down to its essence, this complex procedure involves moving the axes through their range of motion, stopping for periodic measurements against a standard with known dimensions (in this case, a System 3R chuck), and using the compensation tables in the Heidenhain iTNC530 CNC to adjust for error within four decimal places (0.0001 degrees).
Actively managing thermal compensation. With small, precise work, temperature is always a concern. That’s where the machine’s temperature management system comes into play, not to mention tight environmental controls in the segregated area of the shop where it’s housed. However, when surface finish presents just as much of a challenge as part geometry, simply letting the machine’s automatic thermal compensation system do its thing may well be a mistake.
For example, one job (pictured above) involved machining tiny channels into a titanium plate for a microfluidics R&D application. Trochoidal climb milling with a 0.004" end mill proved an efficient means of producing the slots to dimensional specifications. However, achieving 0.2 µm surface finish specification was another matter. Based on advice from Kern, the machine ran without cutting for about 15 min. (sufficient time for the tool assembly to “grow” to its fullest extent), then switched off Z-axis thermal compensation while the tool was in the cut. Reserved only for specific workpiece features with exceptionally stringent surface finish specifications, this strategy prevents the microscopic “hammering” motion resulting from the machine’s automatic response to temperature fluctuations.
Scoping out problems and sweet spots. To my knowledge, most manufacturers would never have reason to use the oscilloscope function of the machine’s CNC. Typically employed by machine tool builders and distributors for axis tuning, the oscilloscope measures electrical signals to determine the difference between the axes’ programmed positions and actual positions. Integral Machining, however, has learned to effectively employ this function for troubleshooting and for determining “sweet spot” cutting parameters that provide the smoothest machining for various cutting tools.
To learn more about how Integral Machining leverages the oscilloscope (and the Kern Evo generally), read the full article.
These inserts for expanded-beam fiber-optic cable connectors use the green lenses to focus and transmit light from one optical fiber to another. The bores holding the optical fibers were held to within +1.5/-0 µm of nominal diameter, positioning within ± 1.5 µm, and an N4-level (0.2- µm) surface finish.
Related Content
3 Tips to Accelerate Production on Swiss Lathes with Micro Tools
Low RPM lathes can cause tool breakage and prevent you from achieving proper SFM, but live tooling can provide an economical solution for these problems that can accelerate production.
Read MoreWatchmaking: A Machinist’s View
Old-world craftsmanship combines with precision machining on a vertical machining center and Swiss-type lathe to produce some of the only U.S.-made mechanical wristwatch movements.
Read MoreWhere Micro-Laser Machining Is the Focus
A company that was once a consulting firm has become a successful micro-laser machine shop producing complex parts and features that most traditional CNC shops cannot machine.
Read MoreRead Next
3 Mistakes That Cause CNC Programs to Fail
Despite enhancements to manufacturing technology, there are still issues today that can cause programs to fail. These failures can cause lost time, scrapped parts, damaged machines and even injured operators.
Read MoreThe Cut Scene: The Finer Details of Large-Format Machining
Small details and features can have an outsized impact on large parts, such as Barbco’s collapsible utility drill head.
Read More


.png;maxWidth=300;quality=90)


.png;maxWidth=300;quality=90)


