
Caliper Tips And Tricks
Calipers, which can be Vernier, dial or digital, are versatile tools for basic length measurement. They can be used on the shop floor, in the inspection room or even in the home by hobbyists.

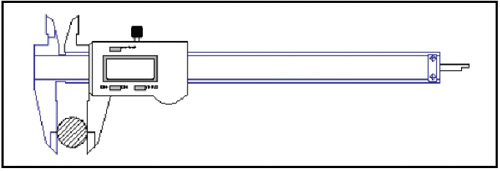
FIG. 1--This gage is used to measure the outside diameter.
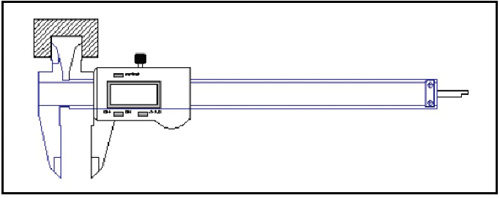
FIG. 2--This gage is used to measure the inside diameter.
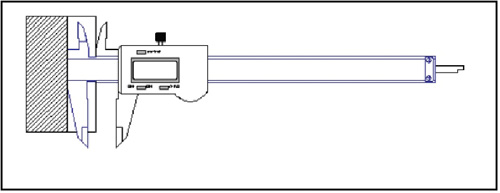
FIG. 3--This gage is used to measure step.
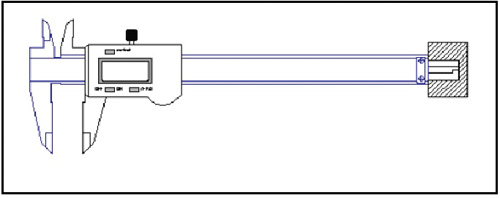
FIG. 4--This gage is used to measure depth.
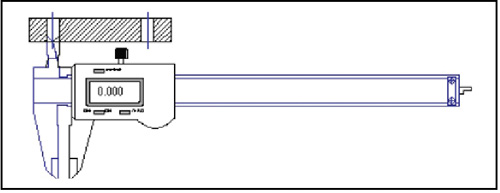
FIG. 5--To measure the center distance between two bores of equal diameter, use the inside jaws to measure the diameter of one of the bores.
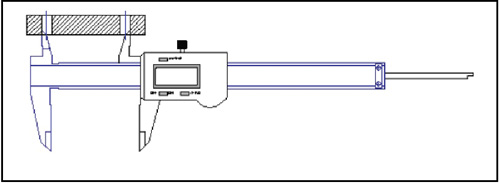
FIG. 6--To measure the center distance between two bores of equal diameter, use the inside jaws to measure the distance between the far surfaces of the two bores.


We are all familiar with the versatility of calipers—Vernier, dial or digital. On the shop floor, in the inspection room or even for the home hobbyist, the caliper is a fast and easy-to-use tool for basic length measurements.
While the caliper is a versatile tool, it is not one of the most precise. Skill is required for positioning and for interpreting measurement results. As the user develops his or her “feel” for the tool, the measurement results become more consistent.
Even a digital caliper, which takes most of the guesswork out of reading the measured value, requires skill on the part of the user to apply the tool properly to the dimension being measured. The jaws of the caliper must be square or perpendicular to the part. They need to be held firmly against the part, but not to the point of deflecting them. The part should be kept as close as possible to the frame of the measurement tool.
Here’s a basic three-step method for using a caliper:
- Close the caliper so the jaws are together, and “zero out” the display. Then, open and close the jaws a couple of times, checking for repeat of the zero setting. If there are a couple of counts of difference, re-zero and try again until you are convinced that there is a good zero condition.
- Measure the part. This is where the operator can influence a measurement. Make sure the caliper is parallel with the line of the measurement (that the jaws of the caliper are square to the measurement surface). On a part with parallel surfaces this looks fairly easy, but more care is needed for an outside diameter. As with checking the zero repeat, check the measurement by repeating it a couple of times to ensure the measurement is correct.
- Once you are satisfied with the measurement, remove the part and go back and check zero. Just as when setting zero, make sure it repeats. An inadvertent zeroing during measurement, or dirt, may show a non-repeating condition.
As shown in Figures 1 through 4 above, almost everyone who has ever used a caliper is familiar with the four basic checks that the gage is designed to do: outside, inside, step and depth
However, digital calipers also have the capability to make compound measurements. An electronic digital caliper can be zeroed at any point, so you can use it to do some of the arithmetic required for calculating the results of a measurement. For example, the following procedure can be used to measure the center distance between two bores of equal diameter:
- Use the inside jaws to measure the diameter of one of the bores (Figure 5). Before you remove the caliper from the bore, press the button to zero the caliper while it is set to the diameter of the hole.
- Still using the inside jaws, measure the distance between the far surfaces of the two bores (Figure 6). The caliper reading will be the distance between the centers of the two bores.
As with any measurement tool, the caliper must be treated with care and respect. Don’t use it for purposes for which it was never intended (such as prying things apart). Wipe it clean after use, and don’t throw it on the workbench. For dial calipers, be particularly wary of dirt, which can accumulate on the rack and distort measurements. Store a caliper in its case. If it’s going to be there for a while, apply a thin coat of oil to the jaws to inhibit corrosion.
Check the caliper often for wear, as well as for burrs and scratches on the jaws and contacting surfaces. A simple way to do this is to pass a master disc along the jaws while inspecting for wear or taper. A caliper should be calibrated at least once a year—more often when use is heavy or there are multiple users of the same instrument.
Calipers are very versatile tools, but they are not right for every job. As we have noted many times, it is critical to pick the correct hand tool or gage for the job. As tolerances get tighter and tighter, selecting the correct gage becomes very important. Digital calipers typically read in 0.001" or 0.0005" units. So if the tolerance is tighter than ±0.002", a micrometer (or some other higher accuracy tool) should be used instead.


Read Next


3 Mistakes That Cause CNC Programs to Fail
Despite enhancements to manufacturing technology, there are still issues today that can cause programs to fail. These failures can cause lost time, scrapped parts, damaged machines and even injured operators.
Read More
The Cut Scene: The Finer Details of Large-Format Machining
Small details and features can have an outsized impact on large parts, such as Barbco’s collapsible utility drill head.
Read More