Auto Supplier Uses System To Gage Thread Depth And Reduce Costs
Each of the thousands of output axle shafts machined by American Axle&Manufacturing (AAM) (Detroit, Michigan) has at least six mounting holes, permitting the half shaft to be bolted securely to the flange. The proper location, depth and thread in each hole is so critical that each hole must be inspected completely-without compromising production rates of more than 200 parts per hour, per gage. Manual inspection was proving to be slow, unreliable and tedious for the operators. That's when the company's plant engineers began searching for an automated thread verification system.
Each of the thousands of output axle shafts machined by American Axle & Manufacturing (AAM) (Detroit, Michigan) has at least six mounting holes, permitting the half shaft to be bolted securely to the flange. The proper location, depth and thread in each hole is so critical that each hole must be inspected completely—without compromising production rates of more than 200 parts per hour, per gage. Manual inspection was proving to be slow, unreliable and tedious for the operators. That’s when the company’s plant engineers began searching for an automated thread verification system.
The gaging system that was chosen, Eagle Thread Verifier’s (ETV) (Sterling Heights, Michigan) self-titled product, provides a method to eliminate manual gaging, expensive rework and field audits. This capability is crucial because thoroughly inspecting tapped holes is essential in automotive and other applications. Improperly tapped holes must be prevented from reaching final assembly to avoid warranty concerns.
Suited for use on the company’s machining lines, the ETV can signal a production line to stop, or it can be set to signal rejection of an unsuitable part. Corrections to the tapping process or tool replacement can be made immediately, eliminating unacceptable production, says the manufacturer.
The gage is controlled through a programmable logic controller (PLC), which also controls the automation that moves the parts through the automated gaging system. If required, the gage control can function as a full turnkey system configured and programmed to manage a complete multifunction gaging station. Additionally, the control can accept data via the Ethernet, thus providing a useful information node in an automated factory.
The engineers at AAM decided to use the ETV to check the presence of six M10 holes in the mounting flange of an output axle shaft. (For this application, a combination go/no go thread gage with a 6H tolerance was used.) Variations in the dimensions of the axle forging coming to the drill and tap machine can sometimes indicate that the tap does not penetrate entirely through the flange, causing a rejected part.
“We are using the gage to verify the cleanliness of the thread and ensure that it is to tolerance,” says David Lau, process engineer at the plant. “We chose this system because of its capability to check depth and torque. The motors have a limited torque capacity, so it actually emulates a person verifying the holes.”
In a matter of seconds, a cycle can automatically confirm properties, such as the presence of the hole; the correct thread pitch lead; the thread depth; the correct location; the perpendicularity of the hole; untapped holes; a broken tap in a hole; incorrect pitch diameter; the starting point of thread; and, if applicable, the depth of a counterbore.
Two six-spindle ETV units replace six to seven employees using manual thread plugs. This way, employees can be assigned more productive tasks. Cycle time lasts approximately 13 to 25 seconds for each six-spindle unit, depending upon production requirements.
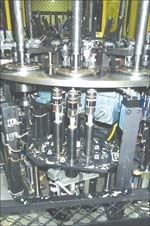
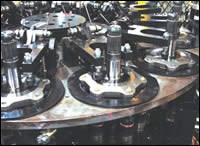
During operation, a robot unloads a pair of axle shafts from the CNC drill/tap machine. It then places the shafts on automation leading to the gaging index table, where the gaging units are located. A part is loaded into position on the index table; the gaging system orients the part and rough checks hole positions. Subsequently, the system checks the relative position of holes to a pilot bore.
On the ETV station, six thread gages are simultaneously threaded through the tapped holes to ensure that they are open and fully threaded. The torque produced is monitored, while the gage travels to the pre-programmed depth. The control displays the status of each part as it proceeds through the system, displaying depth and torque values for each hole in each part. It compares this to acceptable values, as well. This data can be stored or uploaded as required.
“We like the application flexibility,” says Mr. Lau. “We mounted the ETV on an index table that indexes the axles to four probing stations. It can also be used as an independently controlled, stand-alone station to gage thread depth and size prior to shipment and assembly, should we decide to use the system for those purposes.”
AAM goes on to explain that it finds change-over to be simple: To check a different axle, mechanics need only change a mounting bracket corresponding to the new hole locations and replace the thread element in the quick-change chuck. With built-in radial float, the chuck virtually eliminates the need for precise part positioning. The flexibility afforded by this quick-change feature means that hard tooling is no longer needed, says the company. This capability is also said to minimize the inspection cost per hole.
Another benefit of using the new system, as cited by AAM, is being able to pinpoint optimum tool change intervals in the preceding drilling machine. In addition to preventing the shipment of unacceptable parts, this can help maintain plant productivity and production quality, the company says.
Related Content
How to Choose the Right Cut Off When Measuring Roughness
Measurement results for surface finishing parameters can vary depending on the filter parameter (Lc), also known as the cutoff.
Read MoreHow To Calibrate Your Calipers
If you’re interested in calibrating your own digital, dial or Vernier calipers, here are some steps to take to make sure it goes off without a hitch.
Read MoreBuilding an Automation Solution From the Ground Up
IMTS 2022 provides visitors the opportunity to meet with product experts to design automation solutions from scratch.
Read MoreChoosing the Correct Gage Type for Groove Inspection
Grooves play a critical functional role for seal rings and retainer rings, so good gaging practices are a must.
Read MoreRead Next
The Cut Scene: The Finer Details of Large-Format Machining
Small details and features can have an outsized impact on large parts, such as Barbco’s collapsible utility drill head.
Read More3 Mistakes That Cause CNC Programs to Fail
Despite enhancements to manufacturing technology, there are still issues today that can cause programs to fail. These failures can cause lost time, scrapped parts, damaged machines and even injured operators.
Read More


