Fast Gaging For Fuel Efficiency
Tighter standards for automobile emission control and fuel economy translate directly to tighter tolerances for automotive fuel systems. Precision machining alone may not be enough to meet these tolerances because the precision of the complete assembly is what's key.
Tighter standards for automobile emission control and fuel economy translate directly to tighter tolerances for automotive fuel systems. Precision machining alone may not be enough to meet these tolerances because the precision of the complete assembly is what's key. In a fuel injector assembly, the stacking error from dozens of components—even when those components have been exactingly machined—can nevertheless result in too much dimensional variation for the injector to perform effectively.
The trick, therefore, is to know precisely what the error is in individual component workpieces. Mating components can then be matched according to this error. If one piece measures 3 microns on the high side, for example, then the next component in the assembly can be chosen to be 3 microns low so their errors cancel out. In other words, measure the individual components precisely enough, and this information can be used to significantly improve the overall assembly's accuracy.
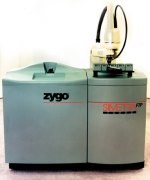
Zygo Corporation (Middlefield, Connecticut) addresses applications like this with its new "Simetra FTP" gage for non-contact measurement of high-volume, precision-machined parts. Fuel injector makers have been its early adopters. Taking advantage of optical technology proprietary to Zygo, the gage takes interferometric measurements of thousands of data points within an automatic cycle that requires 10 seconds or less. These data points can then be used to map the dimensional topography of the part. Perhaps more significantly, however, the data can be used to measure three characteristics of the part simultaneously: flatness, thickness and parallelism.
Speed is the unit's virtue. Using more conventional stylus-based gaging to measure even one of these three characteristics would likely take longer than the 10-second cycle. By contrast, in the right applications, the Simetra unit makes 100-percent measurement of high-volume parts far more practical. In addition, it makes sorting these parts more practical too.
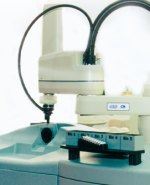
Integrating the gage with a small robot can create an effective system for automatically segregating parts by dimensional variation. For example, the robot could drop workpieces into several bins according to their thickness measurement.
In this scenario, the robot would present the part to the optical measurement zone of the gage, then move the part to the appropriate bin based on the result. The measurement zone on the gage accommodates a maximum workpiece length of 75 mm. Measured surfaces can be as large as 60 mm diagonal or diameter. The published accuracy of the unit is 0.10 micron for flatness, 0.15 micron for parallelism and 0.30 micron for thickness.
The user interface is an integrated flat-panel touch-screen display. The software controlling the unit is based on software used in other, more established optical gages the company also offers. The software can simultaneously present instrument control, surface images, plots and data—as much or as little information as the user requires based on the needs of the application.
Related Content
-
Parts and Programs: Setup for Success
Tips for program and work setups that can simplify adjustments and troubleshooting.
-
How to Choose the Right Cut Off When Measuring Roughness
Measurement results for surface finishing parameters can vary depending on the filter parameter (Lc), also known as the cutoff.
-
Determining Out-of-Roundness at the Point of Manufacture
George Schuetz, Mahr Inc.’s Director of Precision Gages, offers these techniques for measuring roundness on the shop floor.

.jpg;width=70;height=70;mode=crop)


.png;maxWidth=300;quality=90)


