It Takes Firm Resolution To Master The Micro
This shop’s experience of successfully machining a micro aneurysm clip in silicon nitride ceramic points out the need to have CAD, CAM and CNC capability at high resolution—plus the commitment to pull it all together.
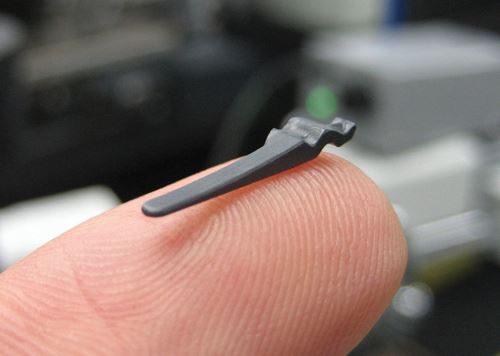
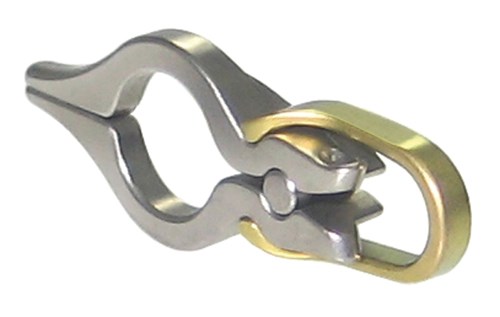
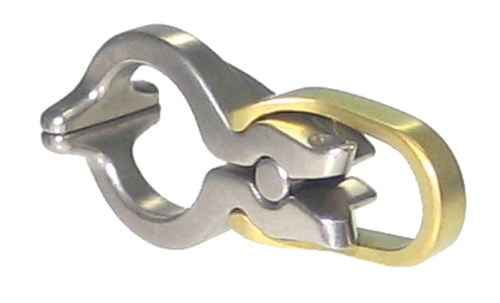
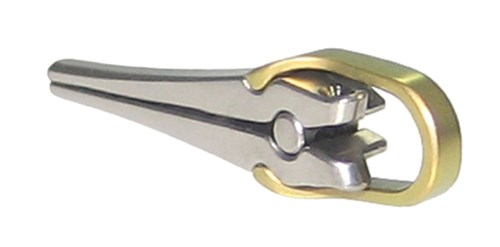
Despite its penchant for small parts, Micro Precision Parts Manufacturing (MPPM) had never seen a job like this. No bigger than a match head, the surgical aneurysm clip would require 1 million toolpath moves across an area measuring less than half an inch. If that weren’t daunting enough, consider that the clip is made of one of the hardest materials on Earth.
What set MPPM apart from more than a dozen manufacturers that dismissed the job as impossible was a firm resolution to devise a viable method for producing the difficult part to tolerances within 20 microns. Little did owner Steve Cotton know that his efforts to develop that method would lead to a deeper understanding of resolution in a different sense. That is, how the resolution capabilities of all tools involved in the process, from the CAD model to the output of the CAM system and CNC, affect the boundaries of his machine tools’ capacity for precision.
Particularly on the CAM side, capability for ultra-high resolution has “opened up the world” in terms of the shop’s ability to machine complex, minute components, Mr. Cotton says. The following provides a look at how the shop attained this capability, the tough job that spurred it to do so and a few broader points that this job illustrates about an issue critical to precision, especially at the micro level.
Shop In A Basement
Mr. Cotton started his career in the watch-making business more than 25 years ago. After completing the Watch Makers of Switzerland Training and Education Program, which he says is “the most respected and highest-grade course in the world,” he started a watch and clock repair service in his native New Zealand. It wasn’t long before he was off to Australia to take a position with Rolex and then back to Switzerland for additional training with that company. In subsequent years he moved to Canada, where he founded another repair shop and eventually took another stint as a Rolex technician.
A serious car accident in 2003 led Mr. Cotton to take a brief foray out of the industry before founding MPPM in the basement of his Qualicum Beach, British Columbia home in 2004. Today, equipment includes a mill and a lathe from Sherline (Vista, California), an OL-1 office lathe from Haas (Oxnard, California), and two Haas OM-2A office mills, each equipped with laser tool presetters from Renishaw (Hoffman Estates, Illinois). Mr. Cotton’s son, Matthew, does most of the programming using the Mastercam CAM system from CNC Software (Tolland, Connecticut).
Unlike the previous companies founded by Mr. Cotton, MPPM has moved beyond repairing and manufacturing components for high-end clocks and watches. In fact, approximately 80 percent of the company’s business consists of minute, precise components such as circuit boards, medical components and even micro nozzles for Caltech, a division of NASA. In large part, this broadening of horizons is due to capabilities achieved during the shop’s attempt to machine prototypes of a new style of surgical aneurysm clip designed by Concept Solutions of Vancouver, British Columbia. Mr. Cotton says Dr. Garnette Sutherland, M.D. of the University of Calgary has stated that the device could advance neurosurgery by 30 years if approved.
From Keeping Time To Saving Lives
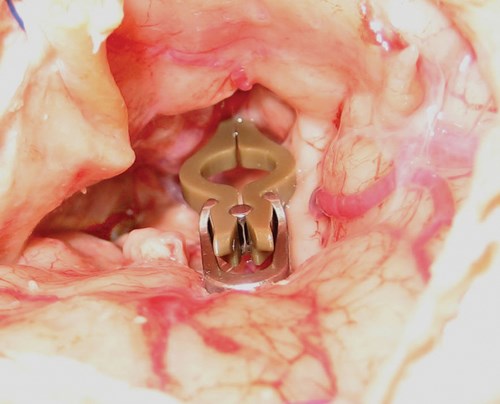
The big deal about the new clip is the material from which it’s constructed: silicon nitride ceramic. Like titanium, this substance is readily accepted by the body. Unlike titanium, it is virtually invisible during MRIs and CT scans, allowing full view of the aneurysm itself (which is basically a bulge in the wall of an artery—clipping prevents it from rupturing and bleeding into the brain). While that’s great for neurosurgeons, the problem for anyone attempting to actually produce such a part is that silicon nitride ceramic is extremely hard, measuring 9.4 on the diamond hardness scale (diamond itself is 10). Add to that 20-micron tolerances, complex 3D contours and minute features that require cutting tools measuring as small as 0.017 inch in diameter, and one might argue that it’s understandable why so many manufacturers had dismissed the project before MPPM came along.
Mr. Cotton says Concept Solutions found his shop online, noting that certified Rolex technicians like himself offer a certain caliber of finesse that the customer likely expected to cross over into his machining work. Despite the part’s difficulty, Mr. Cotton was confident that he could get the job done with his skill and machining resources. This resolve played a key role in convincing Concept Solutions that he could handle it, he says. “We’re not machinists, so we thought outside the box,” he explains. “I thought, ‘if there were a super-hard material in my field, how would I handle that?’ I can’t talk much about what we did because there’s a lot of stuff that no one else knows how to do, but we came at it from a totally different angle, and that really helped us.”
Resolving The Fine Details
Despite Mr. Cotton’s confidence, production hit a snag when MPPM began to machine the jaws from silicon nitride ceramic. The project ultimately spanned six months and involved a number of design iterations, the earliest of which involved cutting the part from relatively easy-to-machine titanium. The shop then moved on to agate, a harder material that rates 7 on the diamond scale, with no problem. However, the final material was so hard that it took MPPM a month to produce the first set of tiny jaws.
The customer was understandably concerned about the speed of the process, as it was eager to move the new clip into the first phases of regulatory testing. For his part, Mr. Cotton was concerned about being too aggressive with his speeds and feeds, which could easily result in breaking a slender tool and scrapping one of the jaws at the end of a painfully long and expensive machining process. Determined to speed things up in whatever way possible, Mr. Cotton began calling his machine, tooling, CAM software and other vendors to get help finding the best way to cut this unforgiving material.
All stepped up to the plate, but the input that brought the whole process together was from In-House Solutions, the company’s Surrey, British Columbia-based Mastercam vendor. The major problem for MPPM was that despite having the proper cutters, machine tools and skill set, the shop couldn’t get its CAM software to output sufficiently accurate tool paths for the complex contours and 0.01-mm stepovers the part required. For minute part features—0.007-inch radii, for example—the normal rounding that Mastercam performs as it calculates conventional tool paths could be a source of error. While this difficulty may not surprise some machinists, it was news to Mr. Cotton. “Being watch-makers, we’ve always dealt with small parts. So my initial reaction was ‘why can’t it do this?’”
The answer to Mr. Cotton’s question lies in an issue critical to toolpath precision: the resolution of the CAM system, which is defined by a set of parameters that regulate toolpath tolerances. In-House suggested that modifying the program to run at higher resolution might help produce the clip jaws faster. During a period of about two days, representatives from In-House worked to help MPPM adjust the software’s default parameters so that the program could render tool paths at a much higher resolution than is typically used in conventional machining.
These changes enabled MPPM to render finer, more detailed tool paths to get the part to final geometry and within specification in a reasonable amount of time. However, this also placed additional strain on the system by dramatically increasing the number of calculations it needed to perform. To speed the process, the shop invested in a quad-core, nitrogen-cooled computer with a Jewel server and numerous fans. After that, things proceeded more smoothly.
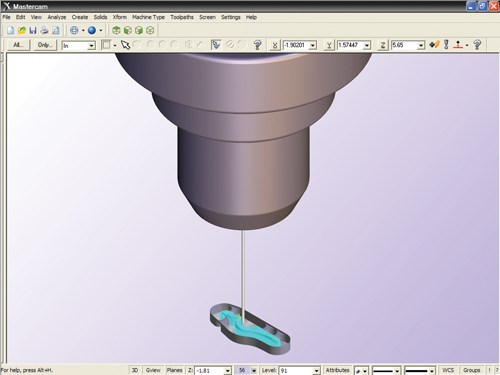
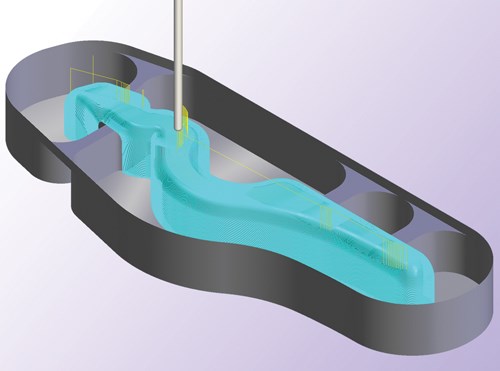
“We had so many tool paths that until you zoomed in 40 or 50 times, you couldn’t see them at all—it just looked like a blue mess,” Mr. Cotton notes. “Our old computer calculated normal Mastercam tool paths perfectly, but once we got into this part and changed the parameter settings it took half an hour to load the program.”
The modifications made by In-House Solutions enabled the shop to reduce production time on the clip jaws from a month of 24/7 operation to about 12 days, Mr. Cotton says. He adds that high-resolution programming has also drastically improved repeatability. “I can take a part now and repeat it time and time again knowing that we’re going to be nearly perfect every time.”
Bringing It All Together
Although pushing Mastercam to work at higher resolution was a prime factor in MPPM’s success with the prototyping job, it would be simplistic to suggest that this could work in all similar instances. Ben Mund, marketing manager at Mastercam, explains that taking advantage of high resolution is possible only if all tools involved in the manufacturing process have similar capability. For example, high-resolution CAM output is pointless if the machine itself is not capable of interpolating at the programmed increments or if the original CAD model isn’t precise enough. “You can crank down the CAM all you want, but the machine will fight it,” Mr. Mund says.
As a shop set up from the get-go to produce small parts, MPPM didn’t have any concerns with the resolution of its machine tools. The four-axis Haas OM-2A office mill used to cut the clip jaws features a 5-mm pitch leadscrew and a resolution of 0.00015 mm, or a little more than a tenth of a micron. By comparison, typical machine resolutions might range to 5 microns, Mr. Mund says.
The machine’s Renishaw laser tool setter, however, was a different matter. Some of the cutters at MPPM were too small for the laser to detect. While Mr. Cotton is no stranger to small tools—his largest is a face mill measuring only ¾ inch—the size of his cutters often draws comments from shop visitors. “Some guys will come in just to see my tools because they don’t believe it,” he notes. “A lot of them just laugh and say ‘you’ve got to be kidding me.’”
The Renishaw technician who was brought in to recalibrate the tool setter reacted similarly upon viewing one problem cutter that measured only 0.001 inch, Mr. Cotton says. Nonetheless, recalibrating the unit enabled it to project a 12-micron beam that can detect the 0.001-inch tool and repeatedly set it within ±0.00025 inch for Z height and width.
Of course, none of these capabilities make a difference if the original CAD model isn’t sufficiently precise. The initial phase of many jobs involves significant back-and-forth consultation with customers to ensure that models are up to par and that each design is machineable. For example, the shop might suggest changes to radii or other dimensions. “Some of the parts we get you can draw all you want, but that doesn’t necessarily mean there’s a viable way to machine them,” Mr. Cotton says.
That’s why MPPM asks every customer to submit a PDF drawing detailing the desired specifications for each part. The shop then runs a full check on the model. The level of customer involvement in refining models that need adjustment varies, but Mastercam’s embedded CAD capability is powerful enough to enable the shop to make adjustments on its own if necessary, Mr. Cotton says.
The Weakest Link?
The fact that MPPM needed to adjust Mastercam’s resolution settings is not indicative of any shortcomings in the software, Mr. Cotton stresses. Rather, the level of detail he was asking for was far beyond what a typical user would need. Not to mention that even without the software modifications made by In-House Solutions, the shop could adjust resolution according to the requirements of the job using standard features within Mastercam—a valuable capability, Mr. Cotton says. “The beauty of the software is that we can tell it how accurate we need it to be, and it’ll generate a tool path to the accuracy we define for each job,” he notes.
The system’s resolution is defined by parameters that include such functions as chordal height; surface deviation; the accuracy of lines, arcs and stepovers; and other maximum acceptable toolpath tolerance bands. Users can adjust these settings within a certain default range, although according to Mr. Mund, many don’t realize they can do so.
He explains that setting Mastercam’s defaults for the range of available settings was essentially an act of compromise between accuracy and calculation speed. As toolpath precision increases, so does calculation time—that’s why MPPM had to purchase a new computer. Most users don’t have the hardware to support calculations at extremely high resolution, nor do they need the software to perform at that level, Mr. Mund says. Out of the box, all of Mastercam’s available settings are precise enough to handle the vast majority of applications without extending calculation time too dramatically.
For MPPM, however, even the minimum default tolerance values were too large for the tool paths needed to produce the clip jaws. When In-House Solutions worked with MPPM to adjust the software, it didn’t set the resolution higher in any permanent sense. Rather, the vendor helped extend the low end of the range of tolerances from which the shop could choose. Specifically, it showed MPPM how to adjust the global parameters within the post, which govern all tool paths, says Ajmer Gill, a technician at In-House.
While the software ships with a default toolpath tolerance of 4 decimal places, MPPM can now set precision to 5 decimal places. Mr. Gill says this allows the shop to set specific settings for each tool path—stepovers, for example—at any level down to the new global minimum.
MPPM uses this capability extensively to adjust resolution according to the precision needed for not only a given part, but also specific operations on that part. For example, the shop might conduct a roughing operation at one stepover setting before stepping the resolution down to enable more precise tool paths—and better surface finish—for finishing operations. Naturally, the higher the necessary resolution to produce a part, the more MPPM charges for the job. “If you want a near-mirror finish, we’ll have to set the resolution way down,” Mr. Cotton explains. “So we might do one or two roughing cuts and three finishing cuts, and for each operation we’ll drop the resolution of the stepover and change the tool, checking each new tool with the laser presetter. The bottom line is that this takes time, and time is money.”
Outside Help
In his efforts to machine the aneurysm clip in a reasonable timeframe, Mr. Cotton
had many more issues to deal with besides CAM software resolution. Dealing with these issues required a great deal of time and effort and extensive reliance on his own skill and ingenuity. However, as mentioned above, In-House Solutions wasn’t the only vendor to lend its expertise to help develop the final process, and Mr. Cotton is more than happy to give credit where credit is due.
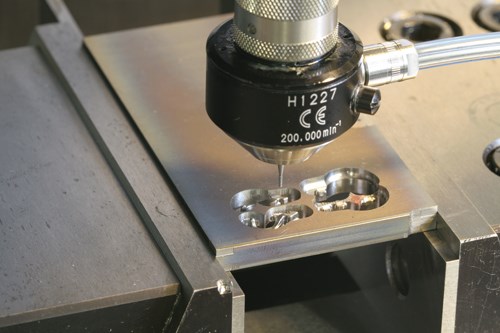
For its part, Haas recommended installing an auxiliary NSK air spindle on the OM-2A office mill. This would provide speeds ranging to 200,000 rpm, much faster than the standard 40,000 rpm and fast enough to enable the shop’s tiny tools to cut the tough silicon nitride. Along with Mastercam’s 3D surfacing and scallop toolpath strategies, the high speeds helped keep lateral loads to levels low enough to avoid breaking the slender cutters.
These cutting tools were expensive—at first. Mr. Cotton designed them himself and his tooling supplier, DiamonBurrs.net, supplied diamond-impregnated (not coated) versions at about $40 each. However, once the tooling designs were perfected, the supplier worked out a volume pricing arrangement that brought the price down to less than $1.
Mr. Cotton also notes that he couldn’t hope to achieve the needed precision without his Renishaw laser tool setters. The shop has few other options for setting tool offsets—touching the tip of, say, a 0.005-inch tool with the steel plate of a conventional tool setter and depressing the spring would crush the cutter. However, a more important consideration is that the smaller the tool, the smaller the margin for error caused by wear or deflection. For MPPM’s minute cutters, errors as little as a hundredth of a millimeter on diameter, Z height or width could result in scrapping a part, Mr. Cotton says. That’s why the shop employs the laser setter after every tool change to ensure consistent cutting. While this adds more time to the process, it ensures accuracy on the smaller parts.
A New Year’s Resolution
While it wasn’t the only factor that enabled MPPM to produce the aneurysm clip prototypes fast enough for the customer’s requirements, high-resolution programming had a far-reaching impact on the shop’s operations as a whole. By making a firm resolution to push his shop—and himself—to the limit in order to produce a tough part that others had dismissed as beyond their ability, Mr. Cotton increased the company’s capacity to pursue the other cutting-edge work that comprises an ever-increasing portion of business.
Moreover, 2010 promises to be an exciting year for the shop, largely because it might not have seen the last of the MRI-invisible aneurysm clip. The device is in the initial stages of regulatory testing, and MPPM expects to begin full production this year. That’s a far cry from making prototypes, but nonetheless, Mr. Cotton has resolved to further refine the process and produce the part even faster.
Related Content
3 Tips to Accelerate Production on Swiss Lathes with Micro Tools
Low RPM lathes can cause tool breakage and prevent you from achieving proper SFM, but live tooling can provide an economical solution for these problems that can accelerate production.
Read MoreWhere Micro-Laser Machining Is the Focus
A company that was once a consulting firm has become a successful micro-laser machine shop producing complex parts and features that most traditional CNC shops cannot machine.
Read MoreWatchmaking: A Machinist’s View
Old-world craftsmanship combines with precision machining on a vertical machining center and Swiss-type lathe to produce some of the only U.S.-made mechanical wristwatch movements.
Read MoreRead Next
3 Mistakes That Cause CNC Programs to Fail
Despite enhancements to manufacturing technology, there are still issues today that can cause programs to fail. These failures can cause lost time, scrapped parts, damaged machines and even injured operators.
Read MoreThe Cut Scene: The Finer Details of Large-Format Machining
Small details and features can have an outsized impact on large parts, such as Barbco’s collapsible utility drill head.
Read More








.png;maxWidth=300;quality=90)


