One Big Reason Your Gage Is Inaccurate
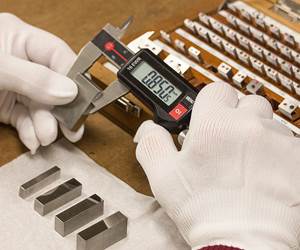
The device itself is often blamed for inaccurate measurement results, but contamination is often the real culprit. Every piece of precision measurement equipment needs to be cleaned properly in order to perform reliably.
The human tendency is to blame the gage or instrument for an incorrect measurement, even though more times than not, the trouble lies somewhere else. Measuring is subject to many variables that need to be eliminated before we can finally take the gage to task, although some gage designs do invite trouble. That’s why it is a good idea to occasionally refresh our memories concerning some of the conditions that interfere with precise measurement or that prevent the gage from doing its best work.
In the past, when a machinist needed to work no closer than to 0.010 inch, the question of gage accuracy cut much less ice. But with today’s tolerances aiming at 0.000010 inch, the slightest error in measurement, no matter what its cause, looms big in proportion.
Plain old dirt is probably the biggest contributor to these errors, as far as just the gage is concerned. Dirt attains such a high ranking because, well, it’s everywhere. Dirt is so common and everyday, we easily forget and often ignore it.
As a quick experiment to observe how detrimental dirt can be to accurate measurement, leave your high-resolution digital micrometer out of its box for a few hours, placed next to a machine tool with the spindle turned back about a quarter-inch, then check it for zero setting. Next, clean the anvils on a slip of clean paper in the customary manner and blow the lint away. Check the zero setting again. Some dirt accumulation is certain. If you can see this type of error with dirt on a digital micrometer, imagine what the effect is when you are working to microinches.
We did a similar experiment with a plain master disc marked 0.7985 inch XX. We set up a precision length machine to this figure and let the master stand unprotected for a number of hours on a workbench out on the shop floor. We then brought it into the temperature control room and let it cool off, but we took special pains not to otherwise touch it or in any way clean off any dirt. Then we measured it. The length machine measure was more than 0.0003 inch larger than the nominal 0.7985-inch setting.
Next, we carefully and thoroughly cleaned the master with alcohol and measured it again. This time the reading was only 0.000004 inch from nominal. Finally, we wiped the now-clean master again, this time in the conventional manner that a worker does, with the palm of the hand. (Nobody, but nobody, ever seems to take a precision measurement without first wiping off the workpiece, the gage blocks or the gage anvil with his finger or the palm of his hand.) When we measured it again, the reading had gone up to 0.000013 inch. The master had lost half of its normal tolerance thanks to that wiping with the palm of the hand.
To compound these fairly clean “dirt” errors, just think about the assortment of gages you see on the grease- and grit-laden apron of the average machining center. The first thing a service technician does when he starts a repair job is to clean the gage, be it an indicator or the most intricate automatic device. Simple cleaning is often about all the “repair” a gage needs.
One of the great advances over the past 10 years or so for measurement devices, especially hand tools and digital calipers, has been IP ratings. The IP, or Ingress Protection, rating defines how susceptible the gage is to liquids and physical contaminations.
I often see application photos that show a hand tool covered with coolant and being used to measure a part in a similar condition. My heart almost stops when I see these photos, as they tend to give the impression that, because of its IP rating, the gage has suddenly become immune to the effects of dirt on the measurement—a false sense of security, for sure. Certainly the gage can withstand the affects of dirt and liquids on its operation, but the dirt will certainly affect its measuring performance.
Even the lowly caliper is subject to the influence of dirt, as it often contains some pretty big particulates, which can deflect its jaws.
The lesson here is that every piece of precision measurement equipment, from the caliper to the lab gage, needs to be cleaned properly whenever dirt is in the area—and this area happens to be everywhere.
Related Content
Understanding Errors In Hand-Held Measuring Instruments
Different instruments (and different operators) are prone to different errors.
Read MoreSelecting The Right Welder
Many machine shops, on occasion, have a need for welding. It may be for maintenance purposes, repair or to fill the odd contract. This story is a welding process primer for those shops whose main business isn't welding but need to know some basics.
Read MoreHow To Calibrate Your Calipers
If you’re interested in calibrating your own digital, dial or Vernier calipers, here are some steps to take to make sure it goes off without a hitch.
Read MoreThreading On A Lathe
The right choices in tooling and technique can optimize the thread turning process.
Read MoreRead Next
The Cut Scene: The Finer Details of Large-Format Machining
Small details and features can have an outsized impact on large parts, such as Barbco’s collapsible utility drill head.
Read More3 Mistakes That Cause CNC Programs to Fail
Despite enhancements to manufacturing technology, there are still issues today that can cause programs to fail. These failures can cause lost time, scrapped parts, damaged machines and even injured operators.
Read More


.png;maxWidth=300;quality=90)


.png;maxWidth=970;quality=90)