
Key CNC Concept #4—The Forms Of Compensation
Though applied for different reasons on different machine types, all forms of compensation allow the CNC user to allow for unpredictable conditions related to tooling.
.jpg;width=70;height=70;mode=crop;format=webp)


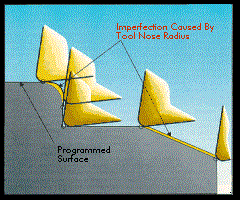
Figure 5. Notice that the tool nose radius will cause deviations from the required work surface if not considered during programming.
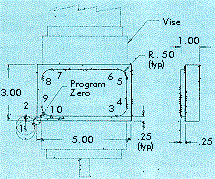
Figure 4. Sample part for cutter radius compensation.
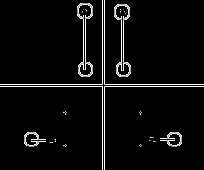
Figure 3. Drawings show how to determine whether to use G41 or G42 to instate cutter radius compensation.
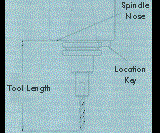
Figure 2. With tool length compensation, the tool's length compensation value is stored separate from the program. Many CNC controls allow the length of the tool to be used as the offset value.
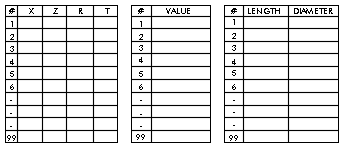
Figure 1. Offset tables in CNCs allow users to compensate for unpredictable conditions related to tooling. The table at right provides an offset position for both tool length and diameter. With a simpler table (middle) that only allows one entry per offset, the programmer must make it quite clear as to the function of each entry. On a popular turning center control, four values can be entered for each offset (at left).
This is the fourth article in a 10 part series about the key concepts of CNC. To start at the beginning, read this article.
All types of CNC machine tools require some form(s) of compensation. Though applied for different reasons on different machine types, all forms of compensation allow the CNC user to allow for unpredictable conditions related to tooling. Before discussing how compensation applies to CNC usage, let's look at compensation in general terms.


Compensation is used in many facets of everyday life. Consider, for example, how a marksman firing a rifle compensates for the distance to the target. The marksman analogy is amazingly similar to what happens with many forms of compensation on CNC equipment, so let's discuss it further.
Say a marksman is standing 50 yards from a target. By one means or another, he would adjust the sight on the rifle to allow for the distance. But until the first shot is fired, the marksman would not know for sure whether the initial sight adjustment was perfectly correct. Once the first shot is fired and the marksman sees the resulting hole location, the sight might have to be fine tuned to adjust for minor imperfections with the initial adjustment.
In similar fashion, the CNC user will be faced with several situations when it will be impossible to predict exactly the result of certain tooling related problems. So one form or another of compensation will have to be used to handle the problem. But just as the marksman may have to fine tune after the initial shot, so may the CNC user have to fine tune the initial compensation entry. More on how and why in a little while.
What Are Offsets?
All forms of compensation work with offsets. You can think of CNC offsets like memories on an electronic calculator. If your calculator has memories, you know you can store a constant value into each memory for use during a calculation. This keeps you from having to enter the number over and over again with redundant calculations.
Like the memories of an electronic calculator, offsets in the CNC control are storage locations into which numerical values can be placed. From the marksman analogy, you can think of the values stored in CNC offsets as like the amount of adjustment required on the sight of the rifle. Keep in mind that the rifle only needed adjustment for one purpose, to adjust for the distance to the target. With most CNC machine tools, there is a need for at least one offset per tool.
Reasons For Tool Offsets
Offsets can be used for several purposes, depending on the style of machine tool and type of compensation being used. Here are some of the more common applications for offsets.
- To specify each tool's length. For machining center applications, it would be very difficult for the programmer to predict the precise length of each tool used in the program. For this reason, the tool length compensation feature allows the programmer to ignore each tool's length as the program is written. At the time of setup, the setup person measures the length of each tool and inputs the tool length value into the corresponding offset.
- To specify the radius of the cutting tool. When milling on the periphery of the cutter, it can be cumbersome and difficult for the programmer to create tool path based on the size of the milling cutter being used. Also, if the cutter size must change (possibly due to re-sharpening), it would be impractical to change the program based on the new cutter size. For this reason, the cutter radius compensation feature allows the programmer to ignore the cutter size as the program is written. The setup person inputs the size of each milling cutter into its corresponding tool offset. Similarly, turning centers have a feature called tool nose radius compensation. With this feature, an offset is used to specify the radius of the very tip of the turning or boring tool.
- To assign program zero. Machining centers that have fixture offsets (also called coordinate system shifting) allow the user to specify the position of the program zero point within offsets, keeping the assignment of program zero separate from the program. Many turning centers also allow the assignment of program zero with offsets (this feature is commonly called geometry offsets).
- To allow sizing on turning centers. Tool offsets are used on all turning centers to allow the operator to hold size with tools used within their programs. This allows the operator to adjust for imperfections with tool placement during setup. It also allows the operator to compensate for wear during each tool's life.
Organizing Offsets
With some CNC controls, the organization of offsets is very obvious. Some machining center controls, for example, automatically make the offset number correspond to the tool station number. With this kind of machine, when tool station number one is commanded, the control will automatically invoke offset number one. Within offset number one, the operator can store a tool length value as well as a tool radius value. Figure 1 shows the offset table for this kind of machining center.
But, not all controls make it this simple. In some, each offset contains only one value and the offset number has no real relationship to the tool station number. In this case, the programmer must cautiously organize which offsets are used with each tool.
For example, the tool length compensation offset numbers can be made the same as tool station numbers. Cutter radius compensation offset numbers can be made equal to the tool station number plus a constant value larger than the number of tools the machine can hold. If the machine can hold 25 tools, tool station number one could be made to use offset number one to store its length compensation value and offset number thirty-one could be used to store its cutter radius compensation value. With this method of offset organization, the programmer and operator are constantly in sync. Figure 1 shows an offset table for this kind of machining center.
The offset table on most turning centers incorporates at least two values per offset. Generally speaking, the programmer will instate the offset number corresponding to the tool station number for each tool offset used. That is, tool number one will use (only) offset number one, tool two will use offset two, and so on. Typically the tool nose radius (R column of the offset table) and the tool type (the T column of the offset table) can be specified within the turning center's offset table. Figure 1 also shows this sort of offset table for a popular turning center control.
Types of compensation
Now let's discuss the compensation types in a little more detail. Keep in mind that while the actual use of these functions can vary dramatically from one machine to the next, the basic reasoning behind each compensation type remains remarkably similar. With an understanding of why the compensation type is required, and with an elementary understanding of how it is applied to one specific control, you should be able to adapt to any variations that you come across.
Tool length compensation
This machining center compensation type allows the programmer to forget about each tool's length as the program is written. Instead of having to know the exact length of each tool and tediously calculating Z axis positions based on the tool's length, the programmer simply instates tool length compensation on each tool's first Z axis approach movement to the workpiece.
At the machine during setup, the operator will input the tool length compensation value for each tool in the corresponding offset. This, of course, means the tool must first be measured. If tool length compensation is used wisely, the tool can be measured off line (in a tool length measurement gage) to minimize setup time. Figure 2 shows one popular method of determining the tool length compensation value. With this method, the value is simply the length of the tool.
A popular command to instate tool length compensation is G43. Within the G43 command, the programmer includes an H word that specifies the number of the offset containing the tool's length value. Here is an example program that utilizes tool length compensation with two tools. The program simply drills two holes (one with each tool). Notice that tool length compensation is being instated in lines N015 and N055.
Program O0001 (Program number)
N005 T01 M06 (Place tool number one in the spindle)
N010 G54 G90 S400 M03 T02 (Select coordinate system, absolute mode, start spindle CW at 400 RPM, get tool number two ready)
N010 G00 X1.0 Y1.0 (Rapid to first
XY position)
N015 G43 H01 Z.1 M08 (Instate tool length compensation on first Z move, turn on coolant)
N020 G01 Z-1.5 F4. (Drill hole)
N025 G00 Z.1 M09 (Rapid out of hole, turn off coolant)
N030 G91 G28 Z0 M19 (Return to tool change position, orient spindle)
N035 M01 (Optional stop)
N040 T02 M06 (Place tool number two
in spindle)
N045 G54 G90 S400 M03 T01 (Select coordinate system, absolute mode, start spindle at 400 RPM, get tool number one ready)
N050 G00 X2. Y1. (Rapid to first XY position)
N055 G43 H02 Z.1 M08 (Instate tool length compensation on tool's first Z move, turn on coolant)
N060 G01 Z-1.2 F5.5 (Drill hole)
N065 G00 Z.1 M08 (Rapid out of hole, turn off coolant)
N070 G91 G28 Z0 M19 (Return to tool change position, orient spindle)
N075 M30 (End of program)
As stated, this feature varies dramatically in use from one control model to the next. You must reference your control manufacturer's programming manual to learn more about how tool length compensation applies to your particular machining center.
Sizing With Tool Length Compensation
Earlier, we said that the marksman would not know for sure whether the initial sight adjustment is perfectly correct until the first shot is fired. In similar fashion, the CNC operator will not know for certain whether the tool length compensation value is perfectly correct until the first workpiece is machined.
Say, for example, the tool length measurement was made incorrectly. During the measurement, the operator finds the tool to be 6.5372 inches long. But the actual tool length is 6.5355 inches. In this case, the tool would machine slightly shallower in Z than it is supposed to. After machining, the minor depth change can be made by adjusting the offset, not the program.
In some cases, even if the tool length value is measured perfectly, other problems may cause the tool to not machine to the proper depth. If, for example, the workpiece or setup is quite weak, tool pressure may cause the workpiece to deflect from the tool during machining.
For critical surfaces or when the effects of tool pressure are unpredictable, the operator can even trial cut the workpiece under the influence of an offset slightly larger than the measured value to ensure that some excess stock will be left. After machining, the operator can measure the surface to determine precisely how much offset change is necessary to machine the workpiece to size.
Cutter Radius Compensation
Just as tool length compensation allows the machining center programmer to forget about the tool's length, so does cutter radius compensation allow the programmer to forget about the cutter's radius as contours are programmed. While it may be obvious, let us point out that cutter radius compensation is only used for milling cutters and only when milling on the periphery of the cutter. A programmer would never consider using cutter radius compensation for a drill, tap, reamer, or other hole machining tool.
Let's begin by discussing four reasons why cutter radius compensation is not only required, but also very helpful to the CNC user.
Program Coordinates Are Easier To Calculate
Without cutter radius compensation, machining center programmers must program the centerline path of all milling cutters. An example program using this technique was shown during our discussion of motion types (key concept number three). When programming centerline path, the programmer must know the precise diameter of the milling cutter and calculate program movements accordingly. This can be difficult enough with simple motions, but when contours become complicated, it can be very difficult to calculate centerline path.
With cutter radius compensation, the programmer can program the coordinates of the work surface, not the tool's centerline path. This eliminates the need for many calculations.
Keep in mind that we are now talking about manual programming. If you have a CAM (computer-aided manufacturing) system, it can probably generate centerline path just as easily as work surface path.
Range Of Cutter Sizes
Say you do program centerline path for a given workpiece contour and do not use cutter radius compensation. Also say you have programmed based on a one-inch diameter tool. But when the job is to be run, you find that your company does not have any one-inch end mills. The closest you have is a 0.875-inch cutter. In this case, the entire cutter path would have to be changed in the program to match the new cutter size. With cutter radius compensation, handling this problem is as simple as changing an offset value.
Easy Sizing
As with tool length compensation, the operator can use the cutter radius compensation offset to help with sizing. If the contour is not coming out to size (possibly due to tool pressure), an offset can be changed to allow for the imperfection.
Roughing And Finishing
This is also a manual programming related reason for using cutter radius compensation. If contours must be rough and finish milled, cutter radius compensation allows the programmer to used the same programmed coordinates to execute each operation. This keeps the programmer from having to calculate two sets of milling coordinates (one for roughing and one for finishing).
To leave stock for finishing during the rough milling, the operator will simply make the cutter radius compensation offset value slightly larger than the cutter's actual size. This will keep the cutter away from the final surface and leave the desired amount of stock for finishing.
How To Program Cutter Radius Compensation
The use of cutter radius compensation does vary from one control to the next.
Additionally, each control will have a set of strict rules that specify how cutter radius compensation is instated, used, and canceled. Here we just show the basics of how it is programmed and give an example for how it is used on one popular control model. You must refer to your CNC control manufacturer's manual for more on your particular control.
Most controls use three G codes with cutter radius compensation. G41 is used to instate a cutter left condition (climb milling with a right hand cutter). G42 is used to instate a cutter right condition (conventional milling). G40 is used to cancel cutter radius compensation. Additionally, many controls use a D word to specify the offset number used with cutter radius compensation.
To determine whether to use G41 or G42, simply look in the direction the cutter is moving during machining and ask yourself if the cutter is on the left or right side of the surface being machined. If on the left, use G41. If on the right, use G42. Figure 3 shows some examples that should help you understand how to determine whether to use G41 or G42 to instate.
Once cutter radius compensation is properly instated, the cutter will be kept on the same side of all surfaces until the G40 command to cancel compensation.
Figure 4 shows the drawing to be used for our example program. In line N025, cutter radius compensation is being instated. From this point on, work surface coordinates can be used for the cutter path. The tool will be kept away from all surfaces by the value stored in offset number thirty-one.
Program O0001 (Program number)
N005 G54 G90 S350 M03 (Select coordinate system, absolute mode, start spindle CW at 350 RPM)
N010 G00 X-.6 Y-.6 (Rapid to point 1)
N015 G43 H01 Z.1 M08 (Instate tool length compensation, move to clearance position in Z, turn on coolant)
N020 G01 Z-.25 F30. (Fast feed to work surface)
N025 G42 D31 Y.25 F4. (Instate cutter compensation to point 2)
N030 X4.25 (Feed to point 3)
N035 G03 X4.75 Y.75 R.5 (Circular move to point 4)
N040 G01 Y2.25 (Feed to point 5)
N045 G03 X4.25 Y2.75 R.5 (Circular move to point 6)
N050 G01 X.75 (Feed to point 7)
N055 G03 X.25 Y2.25 R.5 (Circular move to point 8)
N060 G01 Y.75 (Feed to point 9)
N065 G03 X.75 Y.25 R.5 (Circular move to point 10)
N070 G00 Z.1 M09 (Rapid away in Z, turn off coolant)
N075 G40 (Cancel cutter radius compensation)
N080 G91 G28 Z0 (Return to reference position in Z)
N100 M30 (End of program)
Fixture Offsets
Just as tool length and cutter radius compensation allow the programmer to forget about cutting tools as the program is written, fixture offsets allow the programmer to forget about the workholding setup.
As you know from key concept number one, the programmer will be calculating all coordinates for the program from the program zero point. The CNC control must be told the location of program zero in order to make positioning movements properly. And this must be done before the program can be run.
One very convenient way to specify position of the program zero point is with fixture offsets. Within the fixture offset, the setup person will store the distance between the machine's reference position and the program zero point for each axis. This usually requires that a measurement be taken to determine the required distances.
CNC controls vary dramatically with regard to the words used to instate the fixture offset. Some controls allow only one program zero point to be assigned per program and no special CNC command is needed to instate the fixture offset. This kind of control simply assumes the values have been stored correctly.
Other controls allow multiple program zero points to be specified (with multiple fixture offsets). These controls require that the programmer specify which fixture offset to use. One popular control uses the set of G codes ranging from G54 through G59 for this purpose. G54 instates fixture offset number one, G55 instates fixture offset number two, and so on through G59. Any axis coordinates specified will be taken from the current program zero position. With this kind of control, the setup person must know which fixture offsets are being used in the program in order to store the measured values into the correct locations.
Dimensional tool offsets
This compensation type applies only to turning centers. When setting up tools, it is infeasible to expect that each tool will be perfectly into position. It is likely that some minor positioning problems will exist. And even if all tools could be perfectly positioned, as any single-point turning or boring tool begins cutting, it will begin to wear. As a turning or boring tool wears, it will directly affect the size of the workpiece being machined.
For these reasons, and to allow easy sizing of turned workpieces, dimensional tool offsets are required (also simply called tool offsets). Dimensional tool offsets are instated as part of a four-digit T word. The first two digits indicate the tool station number and the second two digits indicate the offset number to be instated. The command T0101, for example, rotates the turret to station number one and instates offset number one. It is wise to always make the number of the primary offset used with a tool the same as the tool station number.
When a tool offset is instated, the control actually shifts the entire coordinate system by the amount of the offset. It will be as if the operator could actually move the tool in the turret by the amount of the offset. Each dimensional offset has two values, one for X and one for Z. The operator will have control of what the tool does in both axes as the workpiece is being machined.
Here's an example that should help you understand how dimensional tool offsets work. Say you have written a program to use tool number one (with offset number one) to turn a three-inch diameter. After machining the three-inch diameter, it is measured and found to be 3.005 inches. That is, the workpiece is 0.005 inch oversize. In this case, the X value of offset number one will be reduced by 0.005 in. When the program is run again, tool number one will machine the workpiece 0.005 inch smaller.
How To Guarantee Your First Workpiece Comes Out On Size
If working on an engine lathe, manually turning a precise diameter, you would first allow the tool to skim cut to find out exactly where the tool is located. After skim cutting, you can determine precisely how much to adjust the cross slide to make the tool turn the desired diameter.
In the same way, you can use dimensional tool offsets to ensure that a tool will not violate the workpiece on its first full cut. Outside diameter turning tools, for example, can be offset slightly plus in X to ensure that some excess stock is left. Inside diameter bored holes can be offset slightly minus in X for the same purpose. In either case, the first time the tool is run, the operator can rest assured that the workpiece will come out with some excess finishing stock and it will not be scrapped. After machining the first time, the surface can be measured. The operator will then adjust the corresponding offset accordingly and remachine. This time the surface will be machined perfectly to size. Using this technique on each tool in the program will almost guarantee that the first workpiece will be machined correctly.
Tool Nose Radius Compensation
Just as cutter radius compensation allows the programmer to program work surface coordinates, so does tool nose radius compensation. Figure 5 stresses why tool nose radius compensation is required. As you can see, when work surface coordinates are programmed, the tool's radius will cause deviations from the work surface on circular and angular motions.
To determine G41 or G42, simply look in the direction the tool is moving during the cut and ask yourself which side of the workpiece the tool is on. If the tool is on the left, use G41 (this would be the case when boring toward the chuck). If the tool is on the right, use G42 (turning toward the chuck). Once you determine which to use, include the proper G code in the tool's first approach to the workpiece. Once tool nose radius compensation is instated, it remains in effect until canceled.
Keep in mind that the tool nose radius is quite small (usually 1/64, 1/32, 3/64, or 1/16 inch), meaning the deviation from the work surface caused by the tool radius will also be quite small. It is possible that if you are only chamfering corners to break sharp edges, you may not need tool nose radius compensation. However, if the surfaces being machined are critical (morse taper, for example), you must compensate for the radius of the tool. Also, you should only need tool nose radius compensation when finishing. It can cause problems if used during roughing operations due to the constant reversals in direction.
Do You Have A CAM System?
If your company uses a CAM (computer-aided manufacturing) system to help with CNC programming, keep in mind that it may eliminate the need to use tool nose radius compensation. You can have the CAM system output a CNC program that bases all movements on a previously determined tool nose radius.
If, for example, a 1/32 inch tool nose radius is to be used, the CAM system will modify the tool path in the CNC program accordingly. This, of course, requires that the planned tool nose radius be used.
Other Types Of Compensation
The compensation types shown to this point have been for machining centers and turning centers. But all forms of CNC equipment have some form of compensation to allow for unpredictable situations. Here are some other brief examples.
CNC wire EDM machines have two kinds of compensation. One, called wire offset, works in a very similar way to cutter radius compensation to keep the wire centerline away from the work surface by the wire radius plus the overburn amount. It is also used to help make trim (finishing) passes using the same coordinates.
Laser cutting machines also have a feature like cutter radius compensation to keep the laser the radius of the laser beam away from the surface being machined. CNC press breaks have a form of compensation for bend allowances based on the workpiece material and thickness. Generally speaking, if the CNC user is faced with any unpredictable situations during programming, it is likely that the CNC control manufacturer has come up with a form of compensation to deal with the problem.
This is the fourth article in a 10 part series about the key concepts of CNC. To start at the beginning, read this article.
Next Article – Key Concept #5 – The Importance Of Program Formatting


Related Content

When to Use Custom Macros With a CAM System
Custom macros can offer benefits even when using a CAM system to prepare programs – but must be implemented with the right considerations.
Read More
5 G-Code Tips for Increasing CNC Efficiency
Optimizing G code is a low-cost way to improve CNC efficiency without sacrificing usability and safety.
Read More
Five Safety Considerations for CNC Machinists
Safety in CNC environments is essential for users – and for productivity. Consider these 5 points to avoid injury, part failure and downtime.
Read More
6 Machine Shop Essentials to Stay Competitive
If you want to streamline production and be competitive in the industry, you will need far more than a standard three-axis CNC mill or two-axis CNC lathe and a few measuring tools.
Read MoreRead Next

3 Mistakes That Cause CNC Programs to Fail
Despite enhancements to manufacturing technology, there are still issues today that can cause programs to fail. These failures can cause lost time, scrapped parts, damaged machines and even injured operators.
Read More
Obscure CNC Features That Can Help (or Hurt) You
You cannot begin to take advantage of an available feature if you do not know it exists. Conversely, you will not know how to avoid CNC features that may be detrimental to your process.
Read More