What Do Manufacturers Really Know About the Surfaces of the Parts They Are Producing?
Knowing only the average roughness may not be enough. Other surface parameters can affect product quality.
By design, averaging systems filter out all surface components except roughness—the pattern of tool marks caused by turning, grinding, milling or other machining processes. However, if manufacturers only know average roughness (Ra), they may not know nearly enough. Other potential surface problems often created during the manufacturing process, such as waviness, may not be revealed. If left undetected, these surface parameters could directly affect product quality.
With today's high production costs and increasing demand for improved product performance and reliability, this is a critical situation. Yet, most workpiece specifications for surface finish still require only average roughness measurement, relying on instruments that don't reveal the true surface characteristics.
The Case of the Cranky Crankshafts
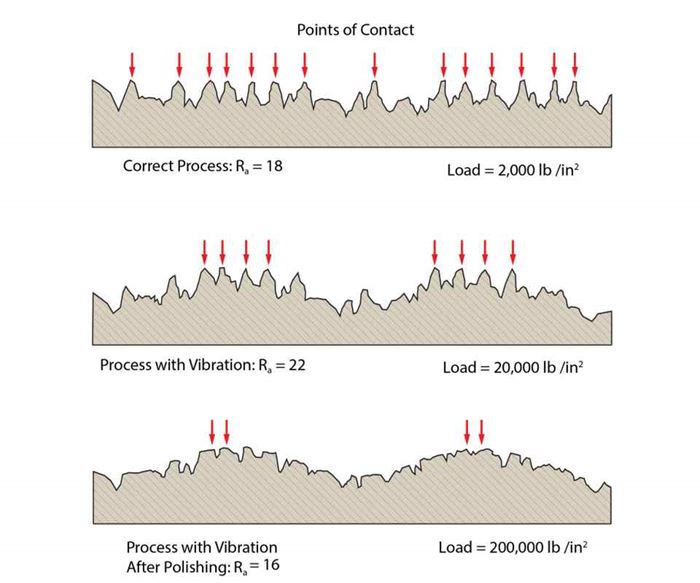
A crankshaft manufacturer was suddenly faced with exploding high-performance engines and many angry customers. A check of the surface roughness on crankshaft journals being machined showed an increase from 18 to 22 microinches on one production line.
After normal corrective procedures failed to get the finish back down to 18 microinches, the manufacturer changed the production process by adding a polishing operation and successfully reducing the average roughness to within specification. The results of this change, however, were disastrous, with the number of rejects jumping from 6 to 98 percent.
Normally, with an 18-microinch average roughness, journal loads were approximately 2,000 pounds per square inch. Profiling showed that the change in roughness readings to 22 microinches was accompanied by lower-frequency waviness, which altered the part geometry. In effect, the normal contact area between the journal and its bearing was significantly reduced, increasing the load to 20,000 pounds per square inch.
Polishing only reduced the contact area, further compounding the problem. The load was then multiplied tenfold, to 200,000 pounds per square inch, causing the crankshafts to crack in less than 200 hours of use. Once discovered, the waviness was traced back to a vibration caused by out-of-round bearings in one of the machine tools on the production line. (See Figure 1.)
The Case of the Compromised Computer Disk
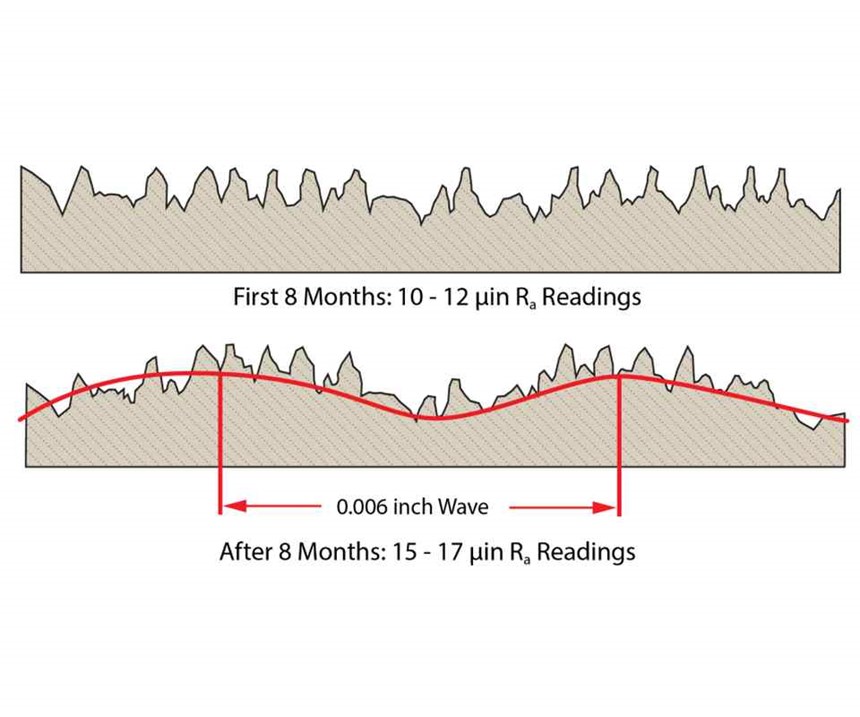
After grinding computer disks using the same process for more than eight months, one manufacturer developed a serious problem. Suddenly, the surface-finish readings (average roughness) dramatically from between 10 to 12 microinches to 15 to 17 microinches, an increase of 50 percent.
Corrective actions, including dressing the grinding wheel, changing the coolant, redressing the wheel and changing the grit, did nothing to remedy the situation. Eventually, a profile of the surface was taken, revealing the problem: a wave measuring 0.006 inch, peak-to-peak. (See Figure 2.)
After extensive investigation, the company determined the cause to be an eccentric shaft in a large air conditioning unit on the roof that vibrated the plant structure as well as the machinery. Such a low-frequency vibration from outside the grinding process was not detected with average roughness equipment.
The Moral of the Stories
While it has a lot of value for qualifying surfaces, the Ra parameter has shown to be a compromised parameter in many cases. Problems, especially with fine surfaces, arise when manufacturers measure only the Ra without having a full understanding of its limitations and the proper selection of cutoff. Most of these problems are easily solved after making a profile of the surface.
Modern surface-finish-measurement equipment can provide a total picture of the surface, extracting each component of a surface profile for individual and comparative analysis. It can separate higher-frequency surface roughness from lower-frequency waviness to detect reasons for any changes in microinch finish during the manufacturing process.
The ability to record and examine total profile of a surface and analyze any of its components can help a manufacturer establish and maintain surface tolerances critical to product performance. Today, achieving optimum surface finish is more than desirable; it is essential.
Related Content
Building an Automation Solution From the Ground Up
IMTS 2022 provides visitors the opportunity to meet with product experts to design automation solutions from scratch.
Read MoreWhat Should Machinists Know About In-Machine Probing?
In-machine probing doesn’t reach the power of CMMs but can still be useful for pre- and mid-process control, as well as for “rough screening” of parts.
Read More4 Ways to Establish Machine Accuracy
Understanding all the things that contribute to a machine’s full potential accuracy will inform what to prioritize when fine-tuning the machine.
Read MoreChoosing the Correct Gage Type for Groove Inspection
Grooves play a critical functional role for seal rings and retainer rings, so good gaging practices are a must.
Read MoreRead Next
The Cut Scene: The Finer Details of Large-Format Machining
Small details and features can have an outsized impact on large parts, such as Barbco’s collapsible utility drill head.
Read More3 Mistakes That Cause CNC Programs to Fail
Despite enhancements to manufacturing technology, there are still issues today that can cause programs to fail. These failures can cause lost time, scrapped parts, damaged machines and even injured operators.
Read MoreObscure CNC Features That Can Help (or Hurt) You
You cannot begin to take advantage of an available feature if you do not know it exists. Conversely, you will not know how to avoid CNC features that may be detrimental to your process.
Read More









.png;maxWidth=300;quality=90)


.png;maxWidth=300;quality=90)


