Lasers Ensure Perpendicularity, Improve Bearing Bore Quality
Hamar Laser’s laser scanners have enabled Hi-Tech Compressor and Pump Products to achieve consistent tolerance readings where dial indicators struggled.
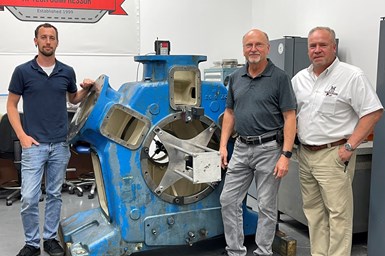
Hi-Tech’s management team (operations director Adam Cojocaru, left; director of quality Don Weidemann, middle; and president Todd Pollazzi, right) credit Hamar Laser for improving the quality and reducing the labor involved in refurbishing of reciprocating compressors. Photos courtesy of Hi-Tech Compressor and Pump Products.
Hi-Tech Compressor and Pump Products is a small company with big capabilities, including full-service machining and in-house thermal spray. It recently improved its quality control capabilities by purchasing a laser-based metrology solution, immediately putting it to use to improve the consistency of perpendicularity and alignment measurements for bearing bores in a reciprocating compressor.
This application was a reconditioning job for a service company that specializes in reciprocating compressors used for P.E.T. bottle blowing. These units’ multi-throw frames are expensive, so being able to repair the bearing bores to better-than-original condition with thermal spray represents a huge savings for the owner. Tolerances are tight, and maintaining perpendicularity is essential.
“They have three in-line bearings on a single shaft, so if there is any misalignment at all, the techs can feel it when they slide the parts together,” says Don Weidemann, Hi-Tech’s director of quality. He initially designed a custom fixture using dial indicators to check the bores, but the extended length of the fixture and indicator arms made it heavy and sensitive to angular movement. Inconsistent, less accurate readings led him to pursue a laser-based quality control system instead.
Plumbing with Lasers
Hamar Laser’s L-702SP Scan Laser with Plumb Beam stood out for its capability to address both perpendicularity and bore alignment. Compared to the previous system, the laser also provides “extremely accurate and consistent results from setup to setup and from person to person,” Weidemann says. “While we had been exceeding the compressor manufacturer’s tolerances with the dial indicator, it had poor gage R&R (repeatability and reproducibility). We would set it up three times and get three slightly different results.”
“Each compressor housing takes approximately 80 hours of labor,” Weidemann says. “By getting them right the first time we save significant warranty and labor costs in not having to repeat parts of the process.”
The L-702SP combines an automatically sweeping laser scan plane with a perpendicular laser “plumb” beam for checking perpendicularity. While the device is primarily designed to align lathes and other machine tools, it adapted easily to Hi-Tech’s compressor housings. The L-702SP has a center resolution of 0.00001 inch (0.00025 mm) and an angular resolution of 0.00001 inch per foot (0.0008 mm per meter). It provides live measurement data in vertical, horizontal, angle and center axes. The proprietary software package is simple enough that Weidemann says Hi-Tech needed no additional on-site training after the Hi-Tech rep’s initial visit.
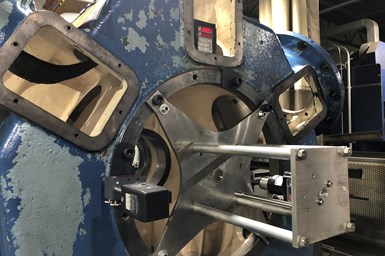
Hamar designed the L-702SP for quick set up so that it could perform spot checks before final machining.
High-Quality ROI
The accuracy and simplicity of Hamar’s L-702SP has lowered Hi-Tech’s labor costs and improved on the final results of its reconditioning efforts.
“Each compressor housing takes approximately 80 hours of labor,” Weidemann says. “By getting them right the first time we save significant warranty and labor costs in not having to repeat parts of the process.”
Adam Cojocaru, Hi-Tech’s service center manager, notes that enhanced accuracy can make a tangible difference for the customer’s equipment. “During final assembly, our customer noticed a decrease in difficulty when installing the second and third bearings into the bores and attributed this to improved concentricity of the finished bores,” he says.
“Typically, you only hear from a customer if they’re not happy,” Weidemann adds. “They actually called us up to tell us that these are going together great – and by the way we have more that we’re going to send you! In the long-run, we expect this customer to see longer bearing life due to improved alignment, which is a very important additional benefit.”
Related Content
4 Ways to Establish Machine Accuracy
Understanding all the things that contribute to a machine’s full potential accuracy will inform what to prioritize when fine-tuning the machine.
Read More6 Machine Shop Essentials to Stay Competitive
If you want to streamline production and be competitive in the industry, you will need far more than a standard three-axis CNC mill or two-axis CNC lathe and a few measuring tools.
Read MoreChoosing the Correct Gage Type for Groove Inspection
Grooves play a critical functional role for seal rings and retainer rings, so good gaging practices are a must.
Read MoreBallbar Testing Benefits Low-Volume Manufacturing
Thanks to ballbar testing with a Renishaw QC20-W, the Autodesk Technology Centers now have more confidence in their machine tools.
Read MoreRead Next
Machining 101: What Are Coordinate Measuring Machines?
Optimized bases, drives, probes, software and more make coordinate measuring machines the most accurate tools for measuring part dimensions.
Read MoreA Case for Combining Workholding with Optical Scanning
Automotive dies and die inserts are often complex, one-off parts with little room for error. Integrity Tool's investments in modular workholding tools and 3D optical scanning have allowed the company to create niche capabilities for its CNC machined parts.
Read MoreVibration: An Invisible Source of Gaging Error
Vibration can make or break a gage’s performance, but vibration errors can be resolved by using a vibration isolation table or other correction measures.
Read More


.png;maxWidth=300;quality=90)


