.png;maxWidth=728;quality=90;format=webp)
A Higbee Thread Milling Custom Macro
Higbee threads provide a full thread form at the very start of the thread. The sharp edge is removed during the machining process.
.jpg;width=70;height=70;mode=crop;format=webp)
Share


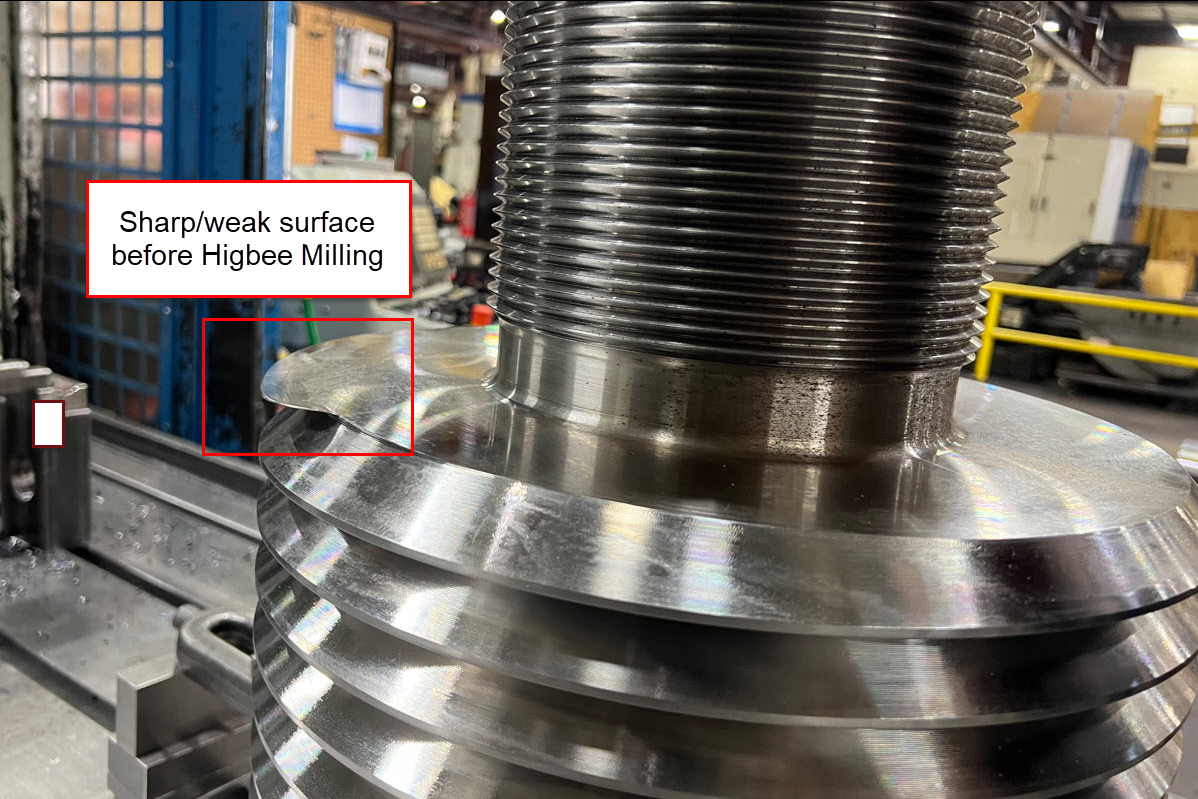
A Higbee thread, also known as a “blunt-start” thread, provides a full thread form at the very start of the thread. Without Higbee milling, and especially when the diameter being threaded is not chamfered, the finished thread will feather down to a very sharp edge. If not deburred, this makes the workpiece dangerous to handle. It also makes for a weak thread and can cause cross threading when fastening to mating parts. With a Higbee thread, the sharp edge is removed during the machining process.

With lathe work, the Higbee portion of the thread can be machined after normal threading with a threading canned cycle. The canned cycle allows fine-tuning if the Higbee portion of the thread does not come out perfectly on the first try.


Higbee threads are also machined on machining centers, but most CNCs do not have a canned cycle for this purpose. After helically milling the thread with a thread-milling cutter, a standard end mill is used to helically mill the Higbee portion of the thread. As with any thread-milling operation, the amount of Z-axis departure per circular motion is related to the portion of a full circle that is being milled.
While Higbee thread milling may be easy enough to program using a CAM system, there will be no easy way to fine tune the machining process at the machine if the Higbee portion of the thread is not coming out as desired. Indeed, it can be difficult to predict the angular positions where the sharp edge and full thread form will be located prior to thread milling a workpiece. The custom macro shown here will mill the Higbee portion of the thread and allows fine tuning at the machine with real-time program edits.
Our example custom macro machines the Higbee portion of an internal right-hand thread with a right-hand milling cutter; therefore, the milling cutter will be conventional milling. Cutter radius compensation is used (G42), so fine tuning the diameter being milled can be easily controlled with an offset. The logic used here could be applied to external and left-hand threads as well.
See Figure 1 to understand most of the input values.

Below is an example calling program. All input arguments are described. All will be tested in the custom macro to set default values and confirm that mandatory arguments have been specified.
- %
- O0001
- (X - CENTER IN X - DEFAULT - 0)
- (Y - CENTER IN Y - DEFAULT - 0)
- (Z - Z SURFACE TO START HELICAL MILLING)
- (B - BIG, MAJOR, DIAMETER)
- (S - SMALL, MINOR DIAMETER)
- (Q - PITCH OF THREAD)
- (A - STARTING ANGLE - ZERO IS THREE O'CLOCK, CCW IS POSITIVE)
- (M - ANGULAR AMOUNT TO MILL - M180.0 IS 1/2 CIRCLE)
- (D - PLANNED CUTTER DIAMETER)
- (T - CUTTER COMP OFFSET NUMBER, CUTTER CENTERLINE PATH IS PROGRAMMED - PLACE DEVIATION IN OFFSET)
- (C - XY CLEARANCE FOR APPROACH AND RETRACT - DEFAULT - CUTTER RADIUS PLUS 0.5)
- (W - Z APPROACH AND Z RETRACT CLEARANCE PLANE RELATIVE TO Z-ZERO)
- (F - MILLING FEEDRATE)
- (E - FAST FEEDRATE - DEFAULT - 100.0 IPM)
- (U - MAXIMUM RADIAL CUT DEPTH)
- (V - HIGBEE PULLOUT ANGLE, MUST BE BETWEEN 45 AND 90 DEGREES - DEFAULT 90.0 DEGREES, STRAIGHT PULLOUT)
- N005 T15 M06
- N010 G53 Z0
- N015 G54 G40 G00 G90 X0 Y0
- N020 G43 H15 Z3.0
- N025 S550 M03
- N030 G65 P1000 Z0 B14.954 S13.370 Q1.0 D2.5 A45.0 M225.0 T15.0 U0.100 V45.0 C1.5 W3.0 F20.0
- N035G90 G00 Z3.0
- N040 G00 G91 G28 Z0.0
- N045 M30
- %
Here is the custom macro:
- %
- O1000 (HIGBEE THREAD MILLING CUSTOM MACRO)
- (SET DEFAULTS)
- IF[#24EQ#0] THEN #24=0 (X DEFAULT)
- IF[#25EQ#0] THEN #25=0 (Y DEFAULT)
- IF[#3EQ#0] THEN #3=#7/2+0.5 (C DEFAULT)
- IF[#8EQ#0] THEN #8=100.0 (E DEFAULT TO 100 IPM)
- IF[#22EQ#0] THEN #22=90.0 (V DEFAULT)
- (TESTING MANDATORY VARIABLES)
- IF [#26 EQ #0] THEN #3000=102 (Z MISSING IN CALL)
- IF [#2 EQ #0] THEN #3000=103 (B MISSING IN CALL)
- IF [#17 EQ #0] THEN #3000=104 (Q MISSING IN CALL)
- IF [#1 EQ #0] THEN #3000=107 (A MISSING IN CALL)
- IF [#20 EQ #0] THEN #3000=109 (T MISSING IN CALL)
- IF [#7 EQ #0] THEN #3000=110 (D MISSING IN CALL)
- IF [#9 EQ #0] THEN #3000=112 (F MISSING IN CALL)
- IF [#19 EQ #0] THEN #3000=114 (S MISSING IN CALL)
- IF [#21 EQ #0] THEN #3000=115 (U MISSING IN CALL)
- IF [#23 EQ #0] THEN #3000=117 (W MISSING IN CALL)
- (TESTING FOR ERRONEOUS INPUT)
- IF[#22GT90.0]THEN #3000=116 (V VALUE TOO LARGE)
- IF[#22LT45.0]THEN #3000=117 (V VALUE TOO SMALL)
- (DETERMINE VALUES NEEDED FOR INTERNAL RIGHT-HAND THREAD)
- #10=225.0+45-#22 (ANGLE FOR FEED OFF)
- #1=#1-#13 (CONVERT A)
- #27=[#2-#19]/2 (THREAD DEPTH)
- (PASSES LOOP)
- #131=1 (COUNTER)
- #132=FUP[#27/#21] (NUMBER OF PASSES)
- #133=#27/#132 (RECALCULATED RADIAL DEPTH PER PASS)
- #126=#27/#132 (CURRENT RADIAL DEPTH)
- #127=#2/2-#7/2-#27+#126 (CURRENT RADIUS TO MILL)
- #30=[#1+#13] (STARTING ANGLE FOR MILLING)
- N50 IF[#131GT#132]GOTO 90
- (MOTION CALCULATIONS)
- #111=#24+COS[#30]*[#127-#3-#27] (APPROACH POSITION IN X)
- #112=#25+SIN[#30]*[#127-#3-#27] (APPROACH POSITION IN Y)
- #113=#24+COS[#30]*#127 (X AT START OF HIGBEE MILLING)
- #114=#25+SIN[#30]*#127 (Y AT START OF HIGBEE MILLING)
- #115=#24+COS[#1]*#127 (X AT END OF HIGBEE MILLING)
- #116=#25+SIN[#1]*#127 (Y AT END OF HIGBEE MILLING)
- #118=COS[#1+#10]*[#3+#27] (FEED OFF X - INCREMENTAL)
- #119=SIN[#1+#10]*[#3+#27] (FEED OFF Y - INCREMENTAL)
- #120=ATAN[ABS[SIN[90-#22]*[#3+#27]]]/[#127-[ABS[COS[90-#22]*[#3+#27]]]] (ANGLE FOR Z MOVE DURING FEED OFF)
- #121=[COS[#30]*#127]*[0-1] (I VALUE)
- #122=[SIN[#30]*#127]*[0-1] (J VALUE)
- (MOTIONS)
- G01 X#111 Y#112 F#8
- G01 Z[#23]
- G01 Z#26
- G01 G42 D#20 X#113 Y#114 F#9
- G02 X#115 Y#116 Z[#26-#13/360*#17] I#121 J#122
- G91 G01 X#118 Y#119 Z-[#120/360*#17]
- G90 Z[#23] F#8
- G40
- (END LOOP)
- #131=#131+1 (STEP COUNTER)
- #126=#126+#133 (STEP CURRENT RADIAL DEPTH)
- #127=#2/2-#7/2-#27+#126 (STEP CURRENT RADIUS TO MILL)
- GOTO50
- N90 M99
- %


.png;maxWidth=300;quality=90;format=webp)

Related Content

3 Task Simplifications That Reduce Production Time
A little ingenuity goes a long way toward improving machine utilization.
Read More
4 Reasons to Use Safety Commands
Safety commands help safeguard CNC applications from common programming or operation errors.
Read More
Obscure CNC Features That Can Help (or Hurt) You
You cannot begin to take advantage of an available feature if you do not know it exists. Conversely, you will not know how to avoid CNC features that may be detrimental to your process.
Read More
6 Variations That Kill Productivity
The act of qualifying CNC programs is largely related to eliminating variations, which can be a daunting task when you consider how many things can change from one time a job is run to the next.
Read More