Machining And Racing
A visit to an automotive racing trade show revealed how some machining technologies are being applied to the production of hard core racing components.
The automotive racing industry will continue to keep machine tools busy for years to come.
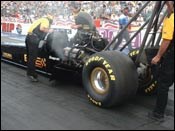
The Motorsport Industry Association, a British racing trade organization, estimates sales of racing products in the United States to be approximately $19.5 billion. What’s feeding this huge market is much more than upper echelon racing leagues such as NASCAR and Indy Racing League. It’s those at the grassroots level—weekend racers competing in a wide variety of racing styles who are constantly on the lookout for that one new component that will give them a performance edge over their competition. Gone are the days of rummaging through junk yards looking for a part to modify. The majority of today’s racers, especially those competing at the local level, prefer to buy components or assemblies designed for their specific application that they can simply bolt on and fine tune. A number of these products were on display at the Performance Racing Industry trade show held this past December in Orlando, Florida.
The PRI show is geared toward builders of race cars and components. The bulk of the 1,400 exhibitors design and manufacture racing engine and drivetrain components. What brought me to the show was its “Machinery Row” area, where 120 suppliers displayed machine tools, cutting tools, metrology devices, CAD/CAM software, and finishing and deburring equipment. Though not nearly as large as typical metalworking trade shows, Machinery Row offered a glimpse of how CNC machining was being applied to, and in some cases tailored toward, the production of hardcore racing components.
The mid- to large-sized racing component manufacturers and race teams understand the importance of CNC machining technology and are using it to their advantage. However, some smaller engine builders and shops that cater to this industry are still advancing up the CNC learning curve. Here’s a snapshot of a few machining technologies that caught my eye at the PRI show.
Port machining—Think of a niche machining operation for the motorsports industry, and 5-axis machining of cylinder head ports is likely to come to mind. These operations machine the intake and exhaust ports of cast cylinder heads, matching them to size and optimizing flow capabilities.
VMCs used for cylinder head porting typically use a trunion table for B and C axis rotation and a special “lollipop” cutting tool to reach inside the ports. Porting can also be performed on a turn/mill machine, such as Mazak’s “e”-series Integrex. In this case, the horizontal lathe spindle provides C-axis rotation, while B-axis motion comes from tilting the milling spindle head.
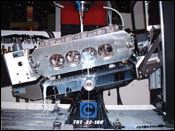
Centroid displayed a head porting system that achieved 5-axis movement using a tilt table. The table, which is shown in the photo installed on a Millport cylinder head porting machine, uses a ballscrew drive to provide 50 degrees of B-axis motion around a central pivot point. The Centroid system includes machine tool, tilt table, probe, cutting tool and seat of Mastercam X. Passages that are created by hand can be scanned with a probe so that all ports can be machined to identically match that port profile.
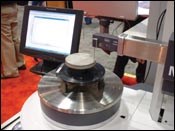
Component-specific inspection—Some metrology equipment manufacturers have adapted measurement devices to simplify the inspection of engine components. For example, Mahr Federal displayed its Primar software, which is available on its MahrForm automated form and position measurement systems. New measurement programs for components such as pistons, camshafts, crankshafts, connecting rods and gears can be created quickly using application-specific templates. After an operator enters information about the part’s size and geometry, the system automatically measures the part’s key features. Measurement results can be reported in table or graphic form. The photo above shows a MahrForm system measuring various features of a piston. The probe rotates 90 degrees clockwise from the position shown to access the ring grooves for measurement.
Reverse engineering—Numerous design changes are common during component R&D and testing phases. Once a physical part is altered from the original CAD model, it must be scanned to capture the new geometry. Surface data can be obtained through a variety of methods. Most common at the PRI show were inspection arms offered by companies such as Faro, Romer and Immersion. These use either touch probes or non-contact laser scanning to capture the part profile.
Laser scanning can capture surface data more quickly than touch probes. Digitizers and portable CMMs with laser scanning capability collect point-cloud data of 3D objects. As the laser line sweeps across the part surface, the captured points appear in real time, allowing the operator to see where point density should be increased. Some systems allow the length of the laser line to be shortened to increase density and better resolve highly curved areas. Software transforms point cloud data into polygon data stored in industry-standard file formats. A CAM package can then take the scan data and generate toolpaths.
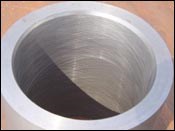
Accurate honing—Properly honed surfaces are key for effective sealing and oil control between mating components. Honing is required for engine cylinders and cylinder sleeves, as well as the big and small ends of connecting rods. The angle of the honing crosshatch is something that builders take into consideration because it affects how oil flows in the cylinder (see cylinder sleeve photo below). In general, a steep crosshatch allows faster oil relief in the cylinder, while a lesser angle retains more oil.
Honing is typically performed on dedicated machines such as Sunnen’s SV-10 automatic cylinder hone. The crosshatch angle is determined by the stroke rate and tool rotational speed. An infinite number of crosshatch angles are possible. The SV-10 accommodates engine blocks as long as 42 inches can bore cylinders measuring from 2 to 8 inches in diameter.
Smooth passages—Cylinder heads and most intake manifolds are cast components (some intakes are produced from welded sheet metal). The casting process leaves behind a rough surface finish for internal passages such as intake runners and cylinder head ports that restricts flow of the air/fuel mixture and exhaust gases. Because an engine is essentially an air pump, unrestricted flow creates more horsepower. The abrasive flow machining (AFM) process developed by Extrude Hone is one way to smooth these internal passages.
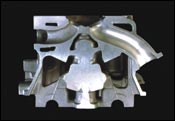
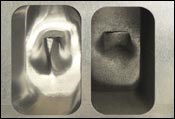
AFM uses abrasive media under pressure to deburr and polish such difficult-to-reach surfaces. For racing applications, the process is typically applied to intake runners and cylinder head ports in order to remove rough surfaces left behind by the casting process (see the smooth port on right). This maximizes flow velocity through the component. Because the polishing is performed parallel to the air/fluid flow, the resulting surface finish “grain” matches the flow direction.
A MicroFlow version of AFM uses media that has lower viscosity and smaller abrasive particles. That media can flow through holes with diameters ranging from 0.002 inch to 0.030 inch. Two common automotive applications are fuel spray injector nozzles and exhaust holes in airbag inflation systems.
Related Content
Sandvik Coromant on Acquisitions: Solutions Entail More Than the Tool
A Q&A with global president Helen Blomqvist explores the cutting tool maker’s acquisition of CAM software companies and how this connects to, among other things, electric vehicles.
Read MoreElectric Vehicles Spark Bright Ideas
Ford alone expects to have production capacity for 600,000 electric vehicles by late 2023, and more than 2 million by the end of 2026. The effects on manufacturing are BIG.
Read MoreSunnen Products Company Partners With Hendrick Motorsports
The partnership puts the new Sunnen SV-series honing machine in the Hendrick Motorsports engine operation alongside other Sunnen honing and engine building machines.
Read MoreMarposs Celebrates its Past, Eyes Future Opportunities
During its open house in Auburn Hills, Michigan, Marposs presentations focused on future opportunities across growing industries such as EV and semiconductors.
Read MoreRead Next
3 Mistakes That Cause CNC Programs to Fail
Despite enhancements to manufacturing technology, there are still issues today that can cause programs to fail. These failures can cause lost time, scrapped parts, damaged machines and even injured operators.
Read MoreThe Cut Scene: The Finer Details of Large-Format Machining
Small details and features can have an outsized impact on large parts, such as Barbco’s collapsible utility drill head.
Read More
.jpg;width=70;height=70;mode=crop)







.png;maxWidth=300;quality=90)

.png;maxWidth=300;quality=90)


