Hexagon's New Laser Sensor Provides Rapid, Accurate Measurements
The HP-L-10.10 sensor can reportedly measure 600,000 individual points per second with a probing form error of just 8 μm, rapidly capturing a complete high-resolution digital representation of a part that is valid for both surface and detailed feature inspection.
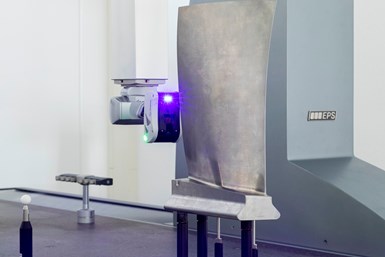
Hexagon’s Manufacturing Intelligence division announced the HP-L-10.10, a non-contact laser sensor for CMMs that offers manufacturers the ability to perform dimensional measurements at comparable accuracy to tactile probing and rapidly inspect almost any surface.
The HP-L-10.10 sensor uses Hexagon’s latest cross-platform laser line scanning technology to offer similar repeatability and performance compared to tactile measurements executed on the same CMM. It can reportedly measure 600,000 individual points per second with a probing form error of just 8 μm, rapidly capturing a complete high-resolution digital representation of a part that is valid for both surface and detailed feature inspection. The HP-L-10.10 is said to be seven times faster than its predecessor and introduces high-precision scanning.
The new sensor employs Hexagon’s unique SHINE (Systematic High-Intelligence Noise Elimination) technology, which reportedly makes it possible to scan almost any part surface or finish at maximum speed and accuracy without user intervention.
Developed in close collaboration with the device, Hexagon’s PC-DMIS inspection software enables users to automatically produce efficient laser-scanning paths by automatically generating the tips, scans and motions needed for measurement. The software can capture a single point cloud with variable point cloud density within one motion that is valid for both surface and detailed feature inspection. Users can visualize surface imperfections using the scanner to identify perceived quality issues and imperfections.
When measuring large parts or remotely programming the CMM, Hexagon says the user experience is greatly enhanced by an integrated overview camera that provides a clear view of the work area with visible guides on the part that indicate the measurement range. The visible guides help to warn the quality technician when the measurement range is exceeded, enabling for easier routine creation and inspection through PC-DMIS software. The overview camera is said to improve productivity and collaboration during inspection; for example, photographing a part surface that is out of tolerance to so the operator and production colleagues can quickly locate the problem.
Related Content
-
Choosing the Correct Gage Type for Groove Inspection
Grooves play a critical functional role for seal rings and retainer rings, so good gaging practices are a must.
-
How to Calibrate Gages and Certify Calibration Programs
Tips for establishing and maintaining a regular gage calibration program.
-
5 Things CNC Operators Must Know About Sizing Adjustments
For CNC operators, sizing adjustment is an essential skill. Keep these points in mind when training new CNC users.


.png;maxWidth=300;quality=90)


