
5 Things CNC Operators Must Know About Sizing Adjustments
For CNC operators, sizing adjustment is an essential skill. Keep these points in mind when training new CNC users.
.jpg;width=70;height=70;mode=crop;format=webp)
Share


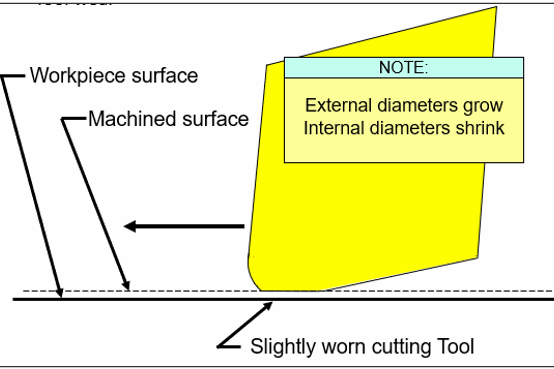
Sizing adjustments are required during production runs if cutting edges of cutting tools wear enough to cause machined surfaces to grow or shrink out of their tolerance bands, as shown here.
Today, companies that use CNCs find it nearly impossible to hire qualified CNC operators in the numbers required. As a result, they are hiring people with limited or no shop experience and training them from scratch. One area that poses special challenges for new CNC operators is making sizing adjustments. Here are five steps to help train them.
- Give a definition and explain when and why sizing adjustments are required.
So what is a sizing adjustment? A sizing adjustment is a modification, to a cutting tool or one of its offset registers, that will bring a measured machined attribute from an undesirable condition to one that is acceptable.
Sizing adjustments are required during setup and, assuming numerous workpieces must be produced, production runs. They are required during setup because, try as they might, setup people cannot perfectly determine and specify certain cutting tool features, like position, length and radius. Even if they could, other factors, like tool pressure, will affect the quality of their initial entries. Setup people must carefully size in each machined surface when running the first workpiece. If they do so properly, the first workpiece will be a good one and, when the production run begins, all machined surfaces will be close to their target values.
Sizing adjustments are required during production runs if cutting edges of cutting tools wear enough to cause machined surfaces to grow or shrink out of their tolerance bands. A sizing adjustment must be made, of course, before this happens.
- Relate the math that goes into making sizing adjustments.
The required math is simple: addition, subtraction, multiplication and division. The trick lies in repeatedly performing simple calculations without making mistakes. Be sure to explain the concept of polarity. Each sizing adjustment will be positive or negative.
- Explain, demonstrate and have newcomers practice taking measurements.
This is the most challenging step. CNC people must be able to take accurate measurements. You can simplify the process by providing gauges that have digital displays. Even so, there will always be some gauges that have dial or Vernier displays that must be mastered. Additionally, newcomers need to acquire a feel for taking measurements. Gauge mastery requires practice, so be patient.
Be sure to provide training for all the gauge types in the shop. This almost always involves variable gauges, such as micrometers, depth gauges and calipers. Explain how to read the various display types — digital display, dial display and Vernier display. And show how to check calibration, something that should be done every time a gauge is used — before and after taking a measurement.
Include any fixed gauges people use, including go/no-go gauges and fixed gauges that incorporate a dial indicator. If dial indicators will be used, explain the various resolutions (dial increments) your company uses. Explain how to check calibration using whatever standards/masters are provided with the gauge by your quality control department.
- Show how to determine whether a sizing adjustment is required and, if so, its value.
Making sizing adjustments requires the ability to evaluate whether a measured machined attribute is within tolerance limits. This means operators must know how to interpret specified tolerances — bilateral (plus/minus), high/low limit or unilateral (plus one value minus another). Of importance for evaluating acceptability are the high and low limits of the tolerance. When sizing adjustments are required, the CNC operator must additionally determine the target value, which is the intended attribute size once the sizing adjustment is made. The target value is often (but not always) the mean value of the tolerance band.
The evaluation of a measured machined attribute will fall into one of these four categories:
Attribute is well within the low and high limit (acceptable)
Attribute is within the tolerance band but close to a limit (acceptable, but barely)
Attribute is smaller than low limit (currently scrap)
Attribute is larger than high limit (currently scrap)
All but the first condition are undesirable, meaning a sizing adjustment will be required in three of the four conditions. And in these cases, the CNC operator must calculate the deviation between the measured value and the intended (target) value. This involves subtracting one value from the other. Be sure to additionally explain how to determine the polarity of the sizing adjustment as well.
-
Explain, demonstrate and have newcomers practice making sizing adjustment at the machine.
Specific techniques will vary from machine to machine but generally, making a sizing adjustment involves modifying the current value of an offset register. Relate how to determine which offset registers are related to a given cutting tool.
Most programmers make the offset number match the tool station number. And most current CNCs have multiple registers per offset — one to specify the cutting tool’s size (position, length and/or radius) and another register for sizing purposes (often called the wear offset). Providing operators with a document that graphically illustrates which offset controls each machined surface will simplify this process (consider providing a color-coded drawing).
If your company uses cutting tools that require physical adjustments to make a sizing adjustment (like finish boring bars used on machining centers), be sure to include them in your discussions.


Related Content

A User-Created Canned Cycle for Porting Tools
FANUC’s version of parametric programming, Custom Macro, enables you to create your own canned cycles tailored to whatever the application requires.
Read More
How to Determine the Currently Active Work Offset Number
Determining the currently active work offset number is practical when the program zero point is changing between workpieces in a production run.
Read More
6 Ways to Streamline the Setup Process
The primary goal of a setup reduction program must be to keep setup people working at the machine during the entire setup process.
Read More
A Balancing Act for Differential Gaging
Differential gaging measures using two devices, which has advantages over standard, comparative measurements using a single sensing head. These include the ability to measure size without regard to position.
Read MoreRead Next

OEM Tour Video: Lean Manufacturing for Measurement and Metrology
How can a facility that requires manual work for some long-standing parts be made more efficient? Join us as we look inside The L. S. Starrett Company’s headquarters in Athol, Massachusetts, and see how this long-established OEM is updating its processes.
Read More