LK Metrology Rotary Index Table Automates Inspection
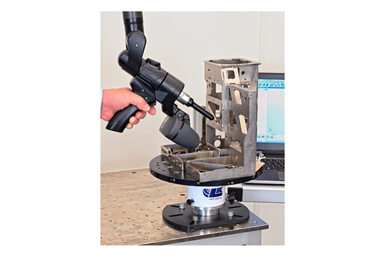
The Freedom Index Table features randomly placed, fixed dimples that are machined onto the table to help the system recognize the part’s orientation.
LK Metrology’s Freedom rotary index table is designed to make inspection more efficient, as well as, in some cases, make it is possible to use a smaller, less expensive arm to access all areas of a component.
Requiring no cables, the portable, manually operated, metrology-grade index table is compatible with any make of portable measuring arm, not just LK’s six- and seven-axis Freedom arm range, which comprises 34 models. The 11.8" (300 mm) or optional 19.6" (500 mm) diameter table is quick to set up on a work surface, after which the operator secures the part to be inspected onto the surface with the aid of pre-drilled, threaded fixing holes or integral clamping magnets.
Initial calibration of the start position is handled by directing the coordinate system in InnovMetric’s PolyWorks|Inspector software to the table. The speed of this procedure is provided by randomly placed, labeled, fixed dimples that are machined into the top of the table and around its periphery. By probing three or more of them using the arm, the software recognizes the irregular pattern and automatically knows the orientation. The user then clicks the on-screen Freedom Index Table macro in the software to update the coordinate system and continue the part inspection.
When the far side of the part needs to be accessed, the table is rotated and three or more reference dimples are probed to update the software as to the new position, and measuring then continues. Both sets of inspection data are aligned automatically by the software, and this is followed by the measurement of geometrical features, evaluation of surfaces using advanced point cloud analysis, part-to-CAD comparison and full reporting in the PolyWorks 3D analysis and quality control software.
Related Content
-
Ballbar Testing Benefits Low-Volume Manufacturing
Thanks to ballbar testing with a Renishaw QC20-W, the Autodesk Technology Centers now have more confidence in their machine tools.
-
6 Machine Shop Essentials to Stay Competitive
If you want to streamline production and be competitive in the industry, you will need far more than a standard three-axis CNC mill or two-axis CNC lathe and a few measuring tools.
-
What Should Machinists Know About In-Machine Probing?
In-machine probing doesn’t reach the power of CMMs but can still be useful for pre- and mid-process control, as well as for “rough screening” of parts.


.png;maxWidth=300;quality=90)
