
Mobile Spreadsheets for Sizing Adjustments
This is one area in which operators often struggle, so provide a reference tool to make the job easier.
.jpg;width=70;height=70;mode=crop;format=webp)
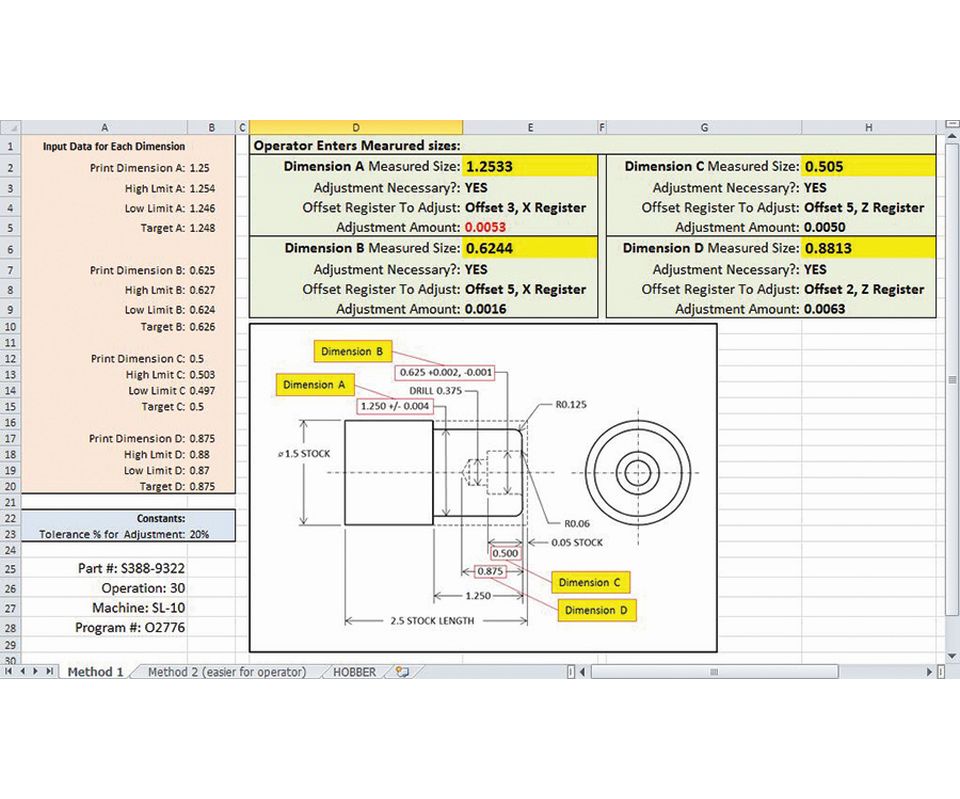
Operators can use spreadsheets like these during sampling inspections to determine whether sizing adjustments are necessary, and if they are, the spreadsheet will show how to make them.
The example spreadsheets shown here can be accessed at cncci.com/jun17.xlsm.
Share


You expect a lot from your CNC operators. Anything you can do to simplify operations or processes will surely improve their productivity. One area in which many operators struggle (especially entry-level operators) is making sizing adjustments. Based on your control plan and during sampling inspections, they must:
1. Measure workpiece attributes and determine whether they fall within tolerance ranges. If they do fall within range and are not approaching tolerance limits, no further action is needed. If they do not, adjustments must be made.
2. If an adjustment is necessary, determine the amount and polarity of the adjustment needed to bring the attribute back to its operator-determined target value. The target value is often, but not always, the mean tolerance value.
3. Determine which offset number and register must be adjusted. This requires knowing which cutting tool machined the workpiece attribute.
4. Enter the adjustment polarity and amount in the appropriate offset register.
While these are very common tasks, even experienced operators sometimes struggle to determine appropriate target values and figure out which offset register must be changed, especially with unbalanced tolerances. Entry-level operators are very prone to making mistakes in these areas.
We have addressed this topic in past columns, and here I offer yet another suggestion that should be of interest to shops that have many repeated jobs and/or medium to large lot sizes: Create a spreadsheet that will run on a mobile device. Operators will use the spreadsheet during sampling inspections to determine whether sizing adjustments are necessary, and if they are, the spreadsheet will show how to make them. The images above show an example and can be accessed at cncci.com/jun17.xlsm. This spreadsheet has been kept simple for illustrative purposes but demonstrates what is possible.
In this spreadsheet, the “Input Data” provide tolerance information about each critical workpiece attribute, including tolerance limits and target values. Under “Constants,” we specify 20 percent as the cutoff point at which an adjustment must be made (this is a changeable value). This indicates that when a workpiece attribute grows or shrinks (due to tool wear) to within 20 percent of a tolerance limit, an adjustment must be made. Finally, the drawing relates each critical workpiece attribute to the required operator entries (Dimension A, Dimension B and so on).
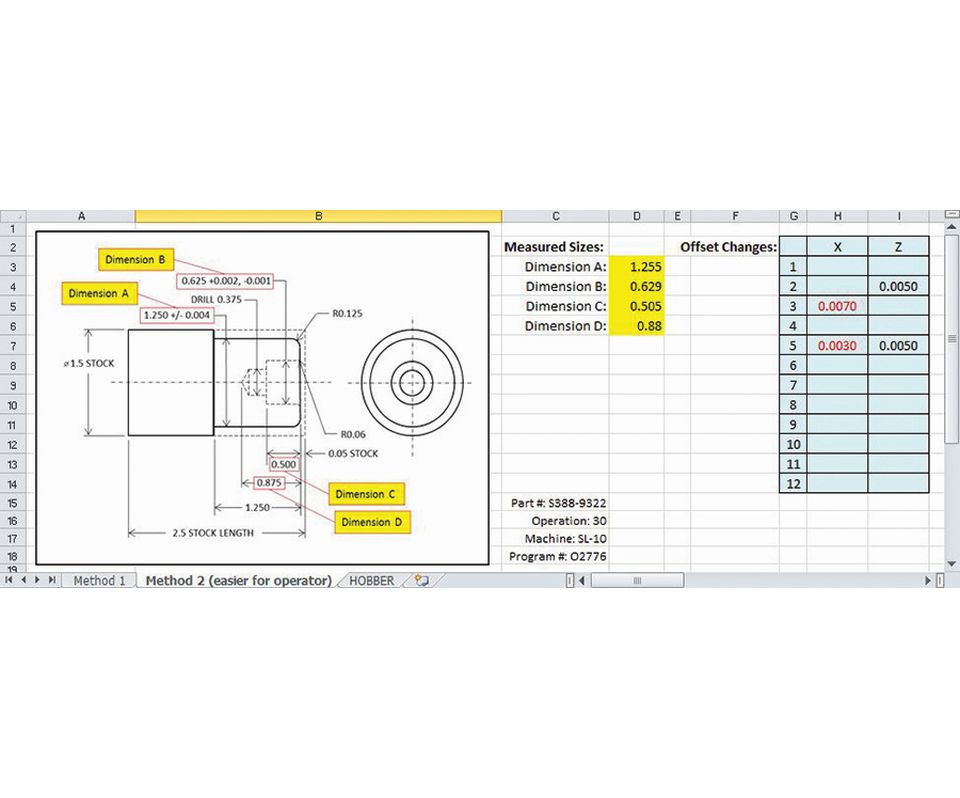
The operator does not need to see the input data or constants. So, to save screen space, they can be hidden, possibly on a different worksheet page, as shown in the bottom image. In fact, you can hide everything except what the operator needs to know and dramatically simplify the spreadsheet for him or her.
The operator will use the spreadsheet on a mobile device at the inspection bench when taking sampling measurements. Based on the control plan, he or she will measure specified workpiece attributes and fill in the spreadsheet with each measured value. In our simple example, measured workpiece attributes are placed in the four yellow fields. Based on these entries, the spreadsheet will relate whether an adjustment is necessary, and if so, the adjustment amount and its polarity. Positive adjustments are shown in black, negative in red. The spreadsheet also specifies the offset register used to make the adjustment. When finished inspecting, the operator will take the mobile device back to the machine and use the spreadsheet results to make any required offset adjustments.
Spreadsheets you create for your shop will surely be more complex than our simple example, and you will, of course, need a different spreadsheet for each job. Once you have created one that works to your liking, use it as a template to create the others.
Here is a summary of benefits you can expect from using spreadsheets like these:
• Elimination of target value calculation. You control the target value specification. This is especially important if you do not want your operators targeting the mean value of the tolerance band, which is the case with small tolerances and/or when you want to extend the time between sizing adjustments.
• Specification of adjustment amount and polarity. The spreadsheet eliminates all sizing calculations, and is especially helpful when operators must relate axis polarity to adjustment polarity, which can be confusing. Remember, measured attributes that are too big do not always require a negative adjustment.
• Specification of where the adjustment must be made. The operator no longer has to figure out which tool station/offset number is involved with machining each critical surface. It is specified right on the spreadsheet.


Related Content

A Higbee Thread Milling Custom Macro
Higbee threads provide a full thread form at the very start of the thread. The sharp edge is removed during the machining process.
Read More
Strange But True: Odd Things That Happen With CNCs
These oddities in the way a CNC naturally behaves can help explain some rather unusual situations that may occur during machining.
Read More
A User-Created Canned Cycle for Porting Tools
FANUC’s version of parametric programming, Custom Macro, enables you to create your own canned cycles tailored to whatever the application requires.
Read More
A Balancing Act for Differential Gaging
Differential gaging measures using two devices, which has advantages over standard, comparative measurements using a single sensing head. These include the ability to measure size without regard to position.
Read MoreRead Next

OEM Tour Video: Lean Manufacturing for Measurement and Metrology
How can a facility that requires manual work for some long-standing parts be made more efficient? Join us as we look inside The L. S. Starrett Company’s headquarters in Athol, Massachusetts, and see how this long-established OEM is updating its processes.
Read More