
How to Choose the Right Dial Indicator
Digital alternatives are replacing dial indicators – but dial indicators can still be useful. Here’s how to select the right one for a given application.

Share


The dial indicator has been around since the early 1900s. While they may be close to riding off into the sunset to be replaced by digital alternatives, dial indicators still make sense in many applications. Their long-term popularity is well earned since dial indicators offer value, including providing good resolution at low cost, but that is not the main reason people still use them.
Dial indicator face. Image: Mahr Inc.
Beyond providing easy-to-read, quantitative measurements with actual measured deviations, dial indicators give users an instantaneous comparative sense of whether a part is good or, if it isn’t, how bad it may be. When tolerance hands or dial markings are employed, users can simply see if the indicator’s needle is within tolerance bands or within the red sections highlighted on the dial. There is no interpretation necessary. Every result may not read as “good,” but even when “bad,” you can get an indication as to how bad it is. Additionally, with a little mental monitoring, an observant user will start to see if good parts are trending towards the tolerance limits.


Dial indicators are available in a wide variety of types, sizes and ranges. The basic principle is that all mechanical indicators translate variations of movement of a plunger and amplify it via gearing into a dial reading. Since some indicators provide dimensional variations as small as 0.00005'/1 µm, these sensitive mechanisms should be handled with the same devoted care given to any other piece of precision equipment.
Today’s manufacturing is designed to a very wide range of tolerances which are trending smaller all the time. Choosing a dial indicator may seem difficult, especially since the number of indicators available is so vast. But thinking about the application and use of the indicator can make selection very basic. Consider the following guidelines for selecting the right model for your application.
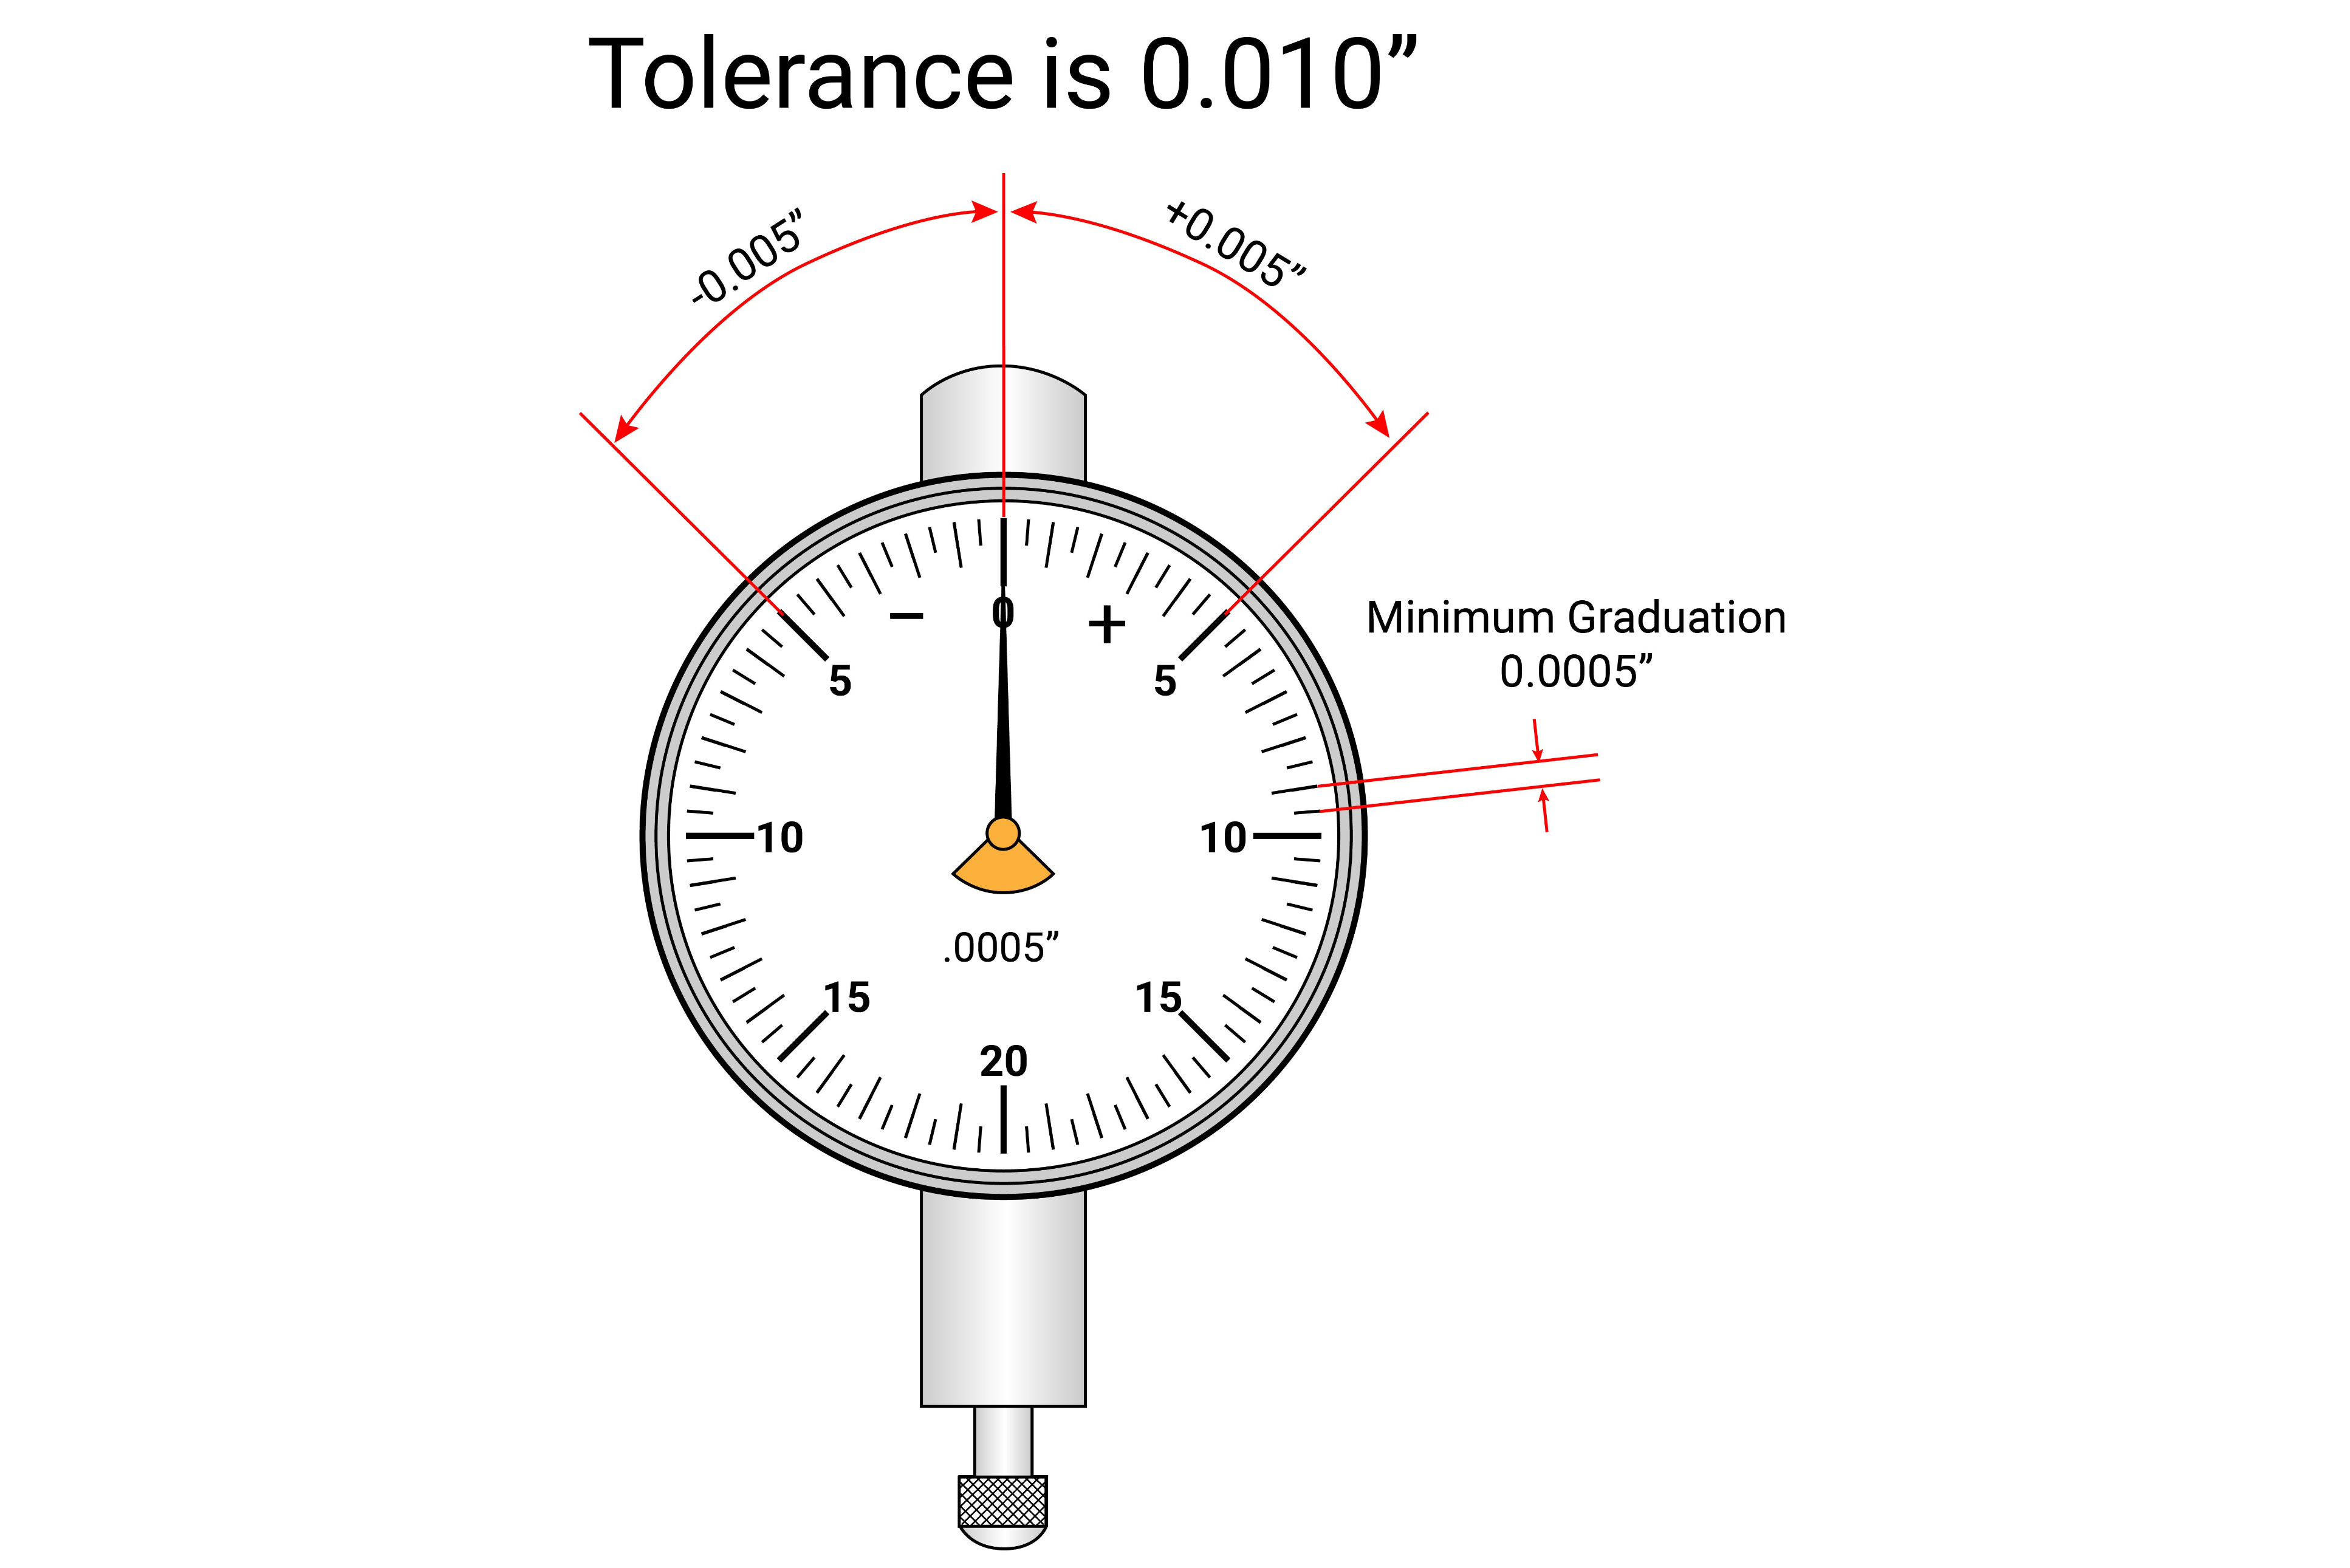
To me, making it easy for the operator to visually classify the tolerance zone on the indicator is the first point to consider. This means looking at the range-per-revolution specification of the indicator, which represents the distance the spindle travels with one complete revolution of the dial hand. From the ranges available, select one that allows the tolerance spread to occupy 1/10 to 1/4 of the dial. Tolerances being at the 10 o’clock and 2 o’clock positions seem to be ideal for most users.
The next consideration is the minimum graduation value, or the value of the smallest graduations marked on the dial. There are several different values available with standard indicators; select the one that is closest to 10%-20% of the tolerance spread of the work being measured. This assures that the tolerance will span about 10 to 20 divisions of the dial. It enables the user to interpolate values to a part of a grad if needed, but at the same time, does not provide so many grads that the hand width is lost.
For example, if the total tolerance for the part is 0.010" or ±0.005", the indicator should have a range per revolution of 0.040" and graduation values of 0.0005" are ideal. This choice uses 25% of the dial for the tolerance zone while the grad spacing easily allows for reading to better than a half of a grad, or more if needed.
Another important choice comes down to the size of the indicator bezel diameter. This selection is based upon space available for the indicator and the distance from which it will be viewed. Whether the indicator will be used on a bench gage or portable gage may also influence this decision. When used on a bench gage where the operator may be standing a distance away, a larger indicator is usually the best choice — typically an AGD group 2 or 3 with bezel diameters of 2.25" to 2.75". However, a portable gage such as a snap gage can be read within an arm’s length. In that case, an AGD group 1 indicator with an approximate 1.5" diameter and lighter weight is the indicator to choose.
A final consideration is the total range of the indicator that represents the maximum distance over which the indicator spindle can travel. Usually, this is 2½ revolutions of the hand, which is adequate for most mechanical bench or portable gaging needs. Sometimes — especially when using the indicator in a bench stand as more of a direct reading indicator rather than a comparative indicator — an option with 1" or more range should fit the bill.
Someday in the not-too-distant future, these considerations may be moot since a digital indicator can provide most of these options (range, resolution, size) with just a handful of models. But until that day comes, a dial indicator may offer the simplest solution in a complex world.


Related Content

A Balancing Act for Differential Gaging
Differential gaging measures using two devices, which has advantages over standard, comparative measurements using a single sensing head. These include the ability to measure size without regard to position.
Read More
Orthopedic Event Discusses Manufacturing Strategies
At the seminar, representatives from multiple companies discussed strategies for making orthopedic devices accurately and efficiently.
Read More
Marathon Precision’s Engineering Playground: One Shop’s Secret to Sustaining High Tech, Low-Volume and High Morale
Half an airplane on the wall, a ten-foot metal dragon, and a full-blown recording studio might not scream “manufacturing efficiency,” yet Marathon Precision proves otherwise. Here’s how forging, complex CNC operations and staff-driven creative projects combine to fuel the shop’s productivity and profitability.
Read More
Ballbar Testing Benefits Low-Volume Manufacturing
Thanks to ballbar testing with a Renishaw QC20-W, the Autodesk Technology Centers now have more confidence in their machine tools.
Read MoreRead Next

Dial vs. Test Indicators
Dial and test indicators are close cousins. They are both mechanical magnifying devices used for dimensional comparison.
Read More
Properly Reading Dial Indicators
Dial indicators provide useful readings about tolerance ranges at a glance — but new users need to know how to set up these indicators before using them.
Read More
How to Successfully Transition from Dial Indicators to Digital
Digital indicators bring a wealth of benefits over dial indicators, but simply swapping one for the other can lead to problems in repeatability and process durability.
Read More