New Honing Options For Hypereutectic Aluminum Cylinder Bores
Hypereutectic aluminum is saturated with silicon particles that must be exposed during honing. A two-stage process first hones a cylinder’s wall to a mirror-like finish and then relieves aluminum around the silicon particles.
Alusil, Lokasil, Silitec, DiASil, Mercosil, ALBOND—these sound like a foreign language, but they are all trade names or trademarks for what is generically known as hypereutectic aluminum, which is a new/old material for cylinder bore wear surfaces. Hypereutectic aluminum is both new and old. Its cousins, hypoeutectic and eutectic aluminum, have been used for pistons and connecting rods for a number of years. One of the earliest applications of hypereutectic aluminum was as the wear surface in an unlined cylinder in some Porsche engines in the 1960s. The 1971 Chevrolet Vega was the first true production automotive engine with a linerless hypereutectic aluminum cylinder bore as the wear surface. Despite the car’s reputation, the cylinder concept was ahead of its time.
When properly finished, hypereutectic aluminum cylinder bores present a surface to the piston rings that is roughly equivalent to glass. The resulting engine has lower friction, excellent sealing, improved dimensional stability, improved heat dissipation, reduced weight, better recyclability, lower manufacturing cost and higher durability compared to the traditional aluminum block with cast iron cylinder liners.
Aluminum Cylinder Evolution
Since the first time gasoline burned and forced a piston down a cylinder, aluminum has been the metal of choice when light weight was the most critical requirement for an internal combustion engine. This is as true today as it was in 1902 when the Wright Brothers were unable to purchase a suitable commercial engine for their experimental airplane and instead built their own, casting the aluminum block.
Automotive OEMs seized upon aluminum for the same reason and found manufacturing advantages, too, in that it is less costly to cast and easier to machine. Aluminum automotive engine blocks are the norm today, and the standard solution for a cylinder wear surface has been a gray iron liner. While low-cost, durable and easy to manufacture (the key decision points for OEMs), engines using the iron-liner solution have inherent disadvantages in weight, size, thermal conductivity, differential thermal expansion and recyclability.
Consider that a minimum land width between cylinders must still be maintained, even with an iron liner. Therefore, the liner-equipped engine is still unnecessarily large, still has differential expansion and reduced heat dissipation issues, still needs a heavier and larger cooling system and so on.
A major advance came in 1971 when GM used Reynolds A390 aluminum alloy in the linerless Vega block. A390 is a hypereutectic alloy saturated with silicon, such that silicon particles are dispersed throughout the alloy similar to chocolate chips in cookies. “Saturated” is the key word, as small amounts of silicon will dissolve in aluminum and become inseparable, but above the saturation point (the “eutectic” point), silicon will precipitate out in crystal form. Typically, this process begins to take place at around a 12-percent silicon concentration, and the hypereutectic cylinder surfaces in use today range from 12 percent to 20 percent or more in silicon concentration. Depending on the manufacturer, traces of other elements likely to be in the alloy can include copper, manganese, magnesium, phosphorus and strontium.
After traditional machining of the Vega engines, the factory cylinder surface was produced by chemical etching to create a surface where individual silicon particles protruded a small distance (perhaps 0.00004"/1 micron or a little more back then) above the aluminum cylinder surface. This process in cylinder preparation was, and still is, called the exposure step, whether done by the OEM or rebuilder. The intent is for the piston rings to ride on the silicon particles, not the aluminum cylinder wall.
Hypereutectic aluminum cylinders have evolved considerably since the Vega. And while GM led the way with the Vega engine, today Europe and Japan are leading the trend to the linerless aluminum block. OEMs using the material include Mercedes, Audi, Porsche, BMW, Volvo, VW, Jaguar, Yamaha and Honda. Manufacturers of power sport vehicles, outboard motors and compressors also use hypereutectic cylinders.
Finishing Without Chemicals
For the OEM, chemical etching of the cylinder wall was a non-traditional process and an intermediate step. The OEM wants to pour the block and put it in a transfer line. Chemical etching also became increasingly burdensome as environmental regulations tightened.
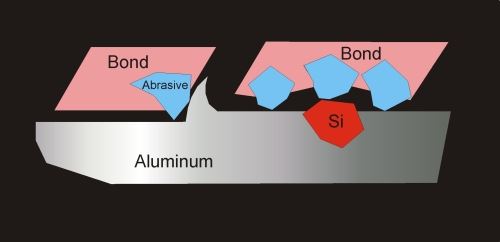
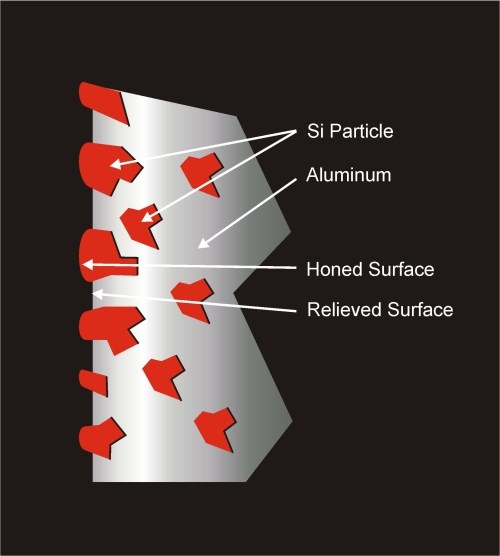
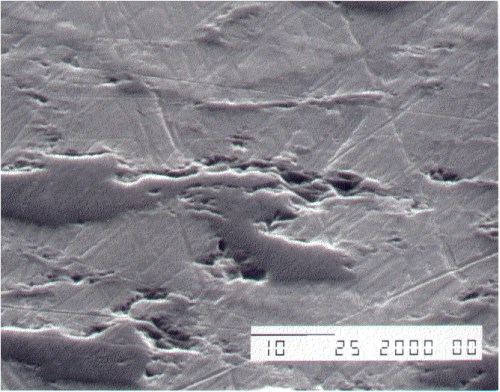
Whether it's in a rebuild shop or an OEM plant, the key to preparing the cylinder surface is to expose a tribologically optimized wear surface of silicon that withstands the grinding friction of pistons rings on the bore surface [Figure 1]. This requires relieving a small amount of aluminum from around the silicon particles. The ideal surface should have flats on the silicon crystals and crystal protrusion of 0.00002" to 0.00004" (0.5 to 1 micron) above the aluminum, with a minimum amount of holes (crystals torn from aluminum) and fractured crystals. The end product can be visualized as lily pads (hard silicon) sitting on still water [Figure 2].
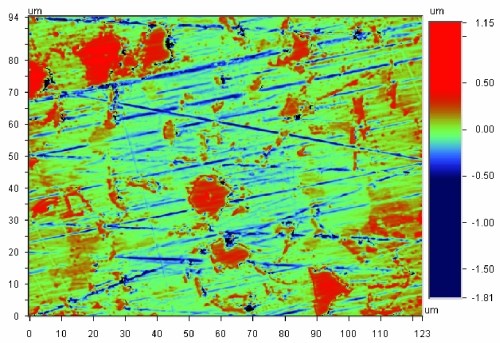
Hypereutectic aluminum crankcases present another obstacle for metal cutting, which has led to advancements in the way the alloy is formulated. Silicon particles quickly destroy cutting tools. As a response to this obstacle, several solutions have evolved, and tooling has improved with PCD and similar materials. Much effort has also been focused on improving tooling life by altering metallurgy to reduce silicon particle size, while retaining the excellent tribological properties of the hypereutectic surface. Based on SEM (scanning electron microscope) and VEECO-Scan studies of early cylinder surfaces and new products on the market today, the silicon crystals appear to have been reduced in size from about 10 microns originally to about 1 micron today, which would materially improve the machinability of the material [Figure 3].
OEMs are devising ways to localize and limit the use of silicon through the use of cast-in hypereutectic aluminum liners, selective die casting and flame-sprayed coatings. Casting the block around special liners complicates the molding step and production rate. Flame spraying represents an additional process step between the mold and the transfer line.
The “Holy Grail” is the ideal combination of metallurgy, cutting tools and lowest-cost casting technology that allows machining blocks straight from the mold, and some OEMs have found it.
Finished Cylinder Bore Specifications
On the rebuilder's side, Sunnen developed a GM-certified method for restoring a factory-quality surface for the Vega engine. Damaged bores were honed oversize using conventional abrasives, followed by an exposure step using a special lapping paste and felt honing pads. The process could be used with hand-held portable tools or honing machines, and it produced excellent results and was ideal for occasional users. That process has since evolved, thanks to metal-bond diamond abrasives, and today there is a new honing option for OEMs or production rebuilders, as well as the low-volume rebuilder. It should also be noted that rebuilders have the option to use a replacement, press-fit hypereutectic aluminum cylinder liner available from Kolbenschmidt if a cylinder is damaged beyond the point where it can be repaired by over-boring or honing. The honing process described here will work with this replacement liner, too.
In our honing process development work, we found that no two manufacturers of hypereutectic cylinders have identical specifications—similar to the situation with plateau specifications for cast iron. Several block manufacturers have patented manufacturing technologies, so rebuilders can expect to see variety in the alloys and the physical makeup of the cylinder wall.
There are, however, some generally common requirements for honing hypereutectic aluminum cylinders. First is the need for excellent geometry. Cylindricity limits of 0.0005" (0.013 mm) are typical. Limits are also placed on the percentage of fractured or displaced silicon crystals at the surface, which must be free of any torn or folded metal.
Because the silicon crystals are distributed throughout the metal in a homogeneous manner, there will always be some that are nearly machined through and will be displaced from the surface. Specifications typically call for about 80-percent intact particles.
There must be a minimum of sub-surface fractured material, which is largely a function of the prior boring step and the amount of material removed by honing.
Lastly, the exposed silicon particles must protrude above the base aluminum from 0.000004" to 0.00004" (0.1 to 1 micron). The exposure height is related to the size of the silicon particles in the alloy. Smaller particle size means less exposure height. Average exposure height today is about 0.00002" (0.5 micron).
Honing Process
Assuming the cylinder was bored using high-quality machinery and PCD or equal inserts, the honing process will have two or three steps: honing, finish honing and exposure. From a honing standpoint, working with hypereutectic aluminum is somewhat the reverse of working with cast iron—the end result is measured as a desired roughness or peak height of the exposed silicon.
The essence of the honing process for hypereutectic aluminum is to first produce an ultra-smooth, mirror-finish surface with the initial honing steps, then finish with an exposure step that will actually increase the roughness, as measured with a Profilometer, by relieving softer aluminum from around the silicon. The desired end result is an exposed surface of rounded-edge primary silicon particles.
Tooling for the initial steps should be selected according to traditional guidelines for high-precision honing. Machine settings, such as rpm, stroking speed, stroke length and so on, should be similar to those used for ordinary precision work. Feed rates are selected to complement the part geometry and abrasive characteristics. All abrasive should be fully trued to produce 100-percent surface contact at the diameter corresponding to the finish-honing step. Crosshatch angle is less important than with cast iron and will typically be rather flat (5 to 10 degrees) because of the slow stroking speed. Instead of a crosshatch, the aluminum cylinder relies on the area between the silicon crystals to hold its oil film. Keep in mind that the goal in the initial steps is to produce a very accurate bore with a fine (mirror) finish.
MAN-845 Honing Oil is the minimum requirement and it should be filtered to at least 0.0004" (10 microns), preferably 0.0002" (5 microns). No water-based coolants should be used. In our process development work, we found that high-performance EP oil caused a sludge buildup, which impeded contact with the ultra-fine honing grit used in the exposure step. This is the result of the extreme surface area and high energy found in freshly cut, ultra-fine metal chips. These conditions facilitate far more aggressive chemical activity with the oil additives than would be experienced with larger metal chips.
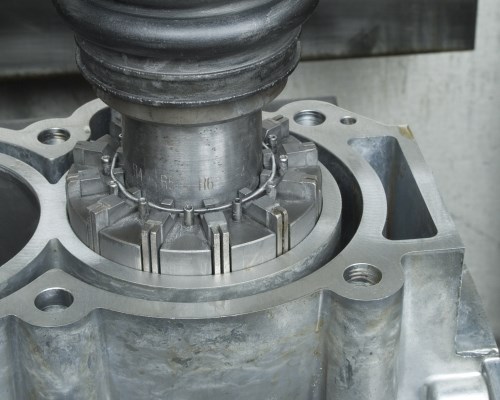
In most cases, the first two honing steps can be accomplished with conventional or diamond abrasives [Figure 4]. However, because of the high value of these engine blocks and the wide variety of OEM materials and manufacturing methods, it is critical for a rebuilder to know the exact recommendation for reconditioning abrasives or consult a honing abrasive supplier. Some cylinder materials may simply require metal-bonded diamond for all of the steps. Conventional abrasives with bronze guide shoes are unquestionably the most economical option for infrequent work with hypereutectic aluminum. In production or OEM work, diamond is preferable for the first two honing passes.
The first honing step may not be required if the block has been bored with a final finish of less than or equal to 19-microinch Ra (0.5-micron). If necessary, as a first honing step we recommend removal of 0.001" (25 microns), using classic abrasives or a 29-micron diamond, to produce a finish less than or equal to 19-microinch Ra (0.5-micron). The second finish-honing step removes 0.0001" (2.5 microns), again using traditional abrasive or a 9-micron diamond to produce a finish less than or equal to 3.9-microinch Ra (0.1-micron).
The final exposure step requires a new specially developed, elastomer-bond abrasive (XM27), using light honing force. For the exposure step, we recommend tooling with the greatest abrasive surface contact area. This step is based on time, typically 1 to 1 ½ minutes for 19-microinch (0.5-micron) exposure height. Longer cycle times are not harmful because the process is somewhat self-limiting. It is absolutely critical that honing force or pressure be kept as low as possible, while still maintaining tool stability. Surfaces shown in the accompanying illustrations were honed with less than 5 lbs/in2 pressure.
The elastomer based “stone” [Figure 5] is purpose-designed to overcome three limitations of rigid abrasive in the silicon exposure process. First, the elastomer serves as a cushion, deforming to allow individual abrasive particles to literally bounce over the silicon particles, while still being rigid enough to cut the surrounding aluminum. Second, the elastomer dampens or limits the overall force applied to the abrasive, making the process very forgiving of variations in pressure from the honing machine feed system. The honing tool diametrical expansion does not have to exactly match the rate at which the cylinder is increasing in diameter from stock removal. Third, the elastomer conforms to any taper or out-of-roundness in the cylinder, allowing it to remove very small (0.00002"/0.5 micron per side) amounts of material uniformly throughout the cylinder. With rigid abrasive, any out-of-roundness in the bore would result in abrasive cutting pressure variations as the honing tool rotated.
Critical Point – Process Verification
Any shop planning to do work on hypereutectic cylinders must have a Profilometer or similar instrument for contact surface texture measurement to verify results. The instrument should produce a trace, not just a readout, and must be capable of Rk, Rpk and Rvk measurements. These engine blocks can cost $4,000 or more, so honing without a Profilometer to verify results would be negligent.
Prior to the exposure step, the Profilometer should show a very smooth surface less than or equal to 3.9-microinch Ra (0.1 micron), which becomes rougher—according to the instrument—after exposure. This change occurs because the instrument senses the exposed silicon crystals as surface finish features (peaks). Several traces of the stylus across the surface may be needed before the stylus hits a silicon particle to verify peak height. The absence of a peak means you probably need to make another trace, and the presence of a peak verifies success. If no peaks are encountered after 8 to 10 traces, more time on the exposure step is needed.
Hypereutectic aluminum is not yet a mainstream material, and the different alloys and OEM manufacturing methods ensure there is no “standard” to refer to yet. However, the honing techniques outlined here were developed for OEM use and can easily be practiced in rebuilding. Nevertheless, until it becomes as familiar as cast iron, rebuilders may want to proceed with caution and consult a honing abrasive supplier as needed.
END
Alusil and Lokasil are registered trademarks of KS Aluminium-Technologie AG. Silitec is a registered trademark of DaimlerChrysler AG. ALBOND is a registered trademark of Mahle GmbH. Mercosil is a registered trademark of Brunswick Corporation. Profilometer is a registered trademark of Warner & Swasey Company.
Glossary of terms
Cylindricity – The tolerance zone limited by two coaxial cylinders a distance apart. A typical spec would state: the toleranced cylindrical surface shall be contained between two coaxial cylinders 0.0002” (0.005 mm) apart.
Profilometer – an instrument used to measure a surface's profile in order to quantify roughness. A contact Profilometer records a surface profile by moving a diamond stylus across a specified distance, with a specified contact force.
Rk – The average core roughness depth based on the Rpk and Rvk measurements.
Rpk – The mean height of peaks protruding from the roughness core profile.
Rvk – The mean depth of the valleys protruding from the roughness core profile.
Rz – The mean highest peak-to-valley measurement taken from five samples.
Tribology – The study of friction, wear and lubrication, and the design of bearings; the science of interacting surfaces in relative motion.
Veeco Scan – a non-contact surface finish/profile analyzer developed for the semi conductor industry, capable of defining surface features with extremely small measurements (millionths) and producing a “topographical map” of a surface. See www.veeco.com for more information.
About the author: Tim Meara is the senior honing technician for Sunnen Products Company.
Related Content
The Strategic Value of Machine Tool Flexibility
This aerospace and defense supplier has a strategy to take advantage of the flexibility in its newest and largest five-axis gantry-type machining center.
Read MoreBeyond the Machines: How Quality Control Software Is Automating Measurement & Inspection
A high-precision shop producing medical and aerospace parts was about to lose its quality management system. When it found a replacement, it also found a partner that helped the shop bring a new level of automation to its inspection process.
Read MoreWhen Organic Growth in Your Machine Shop Isn’t Enough
Princeton Tool wanted to expand its portfolio, increase its West Coast presence, and become a stronger overall supplier. To accomplish all three goals at once, acquiring another machine shop became its best option.
Read MoreHow to Turn Machine Shop Downtime Into Process Expertise
To take advantage of a lull in business, JR Machine devised a week-long cutting tool event that elevated the shop’s capabilities with aerospace alloys.
Read MoreRead Next
The Cut Scene: The Finer Details of Large-Format Machining
Small details and features can have an outsized impact on large parts, such as Barbco’s collapsible utility drill head.
Read More3 Mistakes That Cause CNC Programs to Fail
Despite enhancements to manufacturing technology, there are still issues today that can cause programs to fail. These failures can cause lost time, scrapped parts, damaged machines and even injured operators.
Read More


.png;maxWidth=300;quality=90)


